
Sandhiya Sivakumar
Author
Published on : Feb 17, 2023
Category : BizTalk Server
Looking to avoid doing repetitive tasks, checking if they were completed correctly and, if not, retrying the failed tasks again and again, or being bombarded with false alarms during maintenance? Well, this blog is for you!
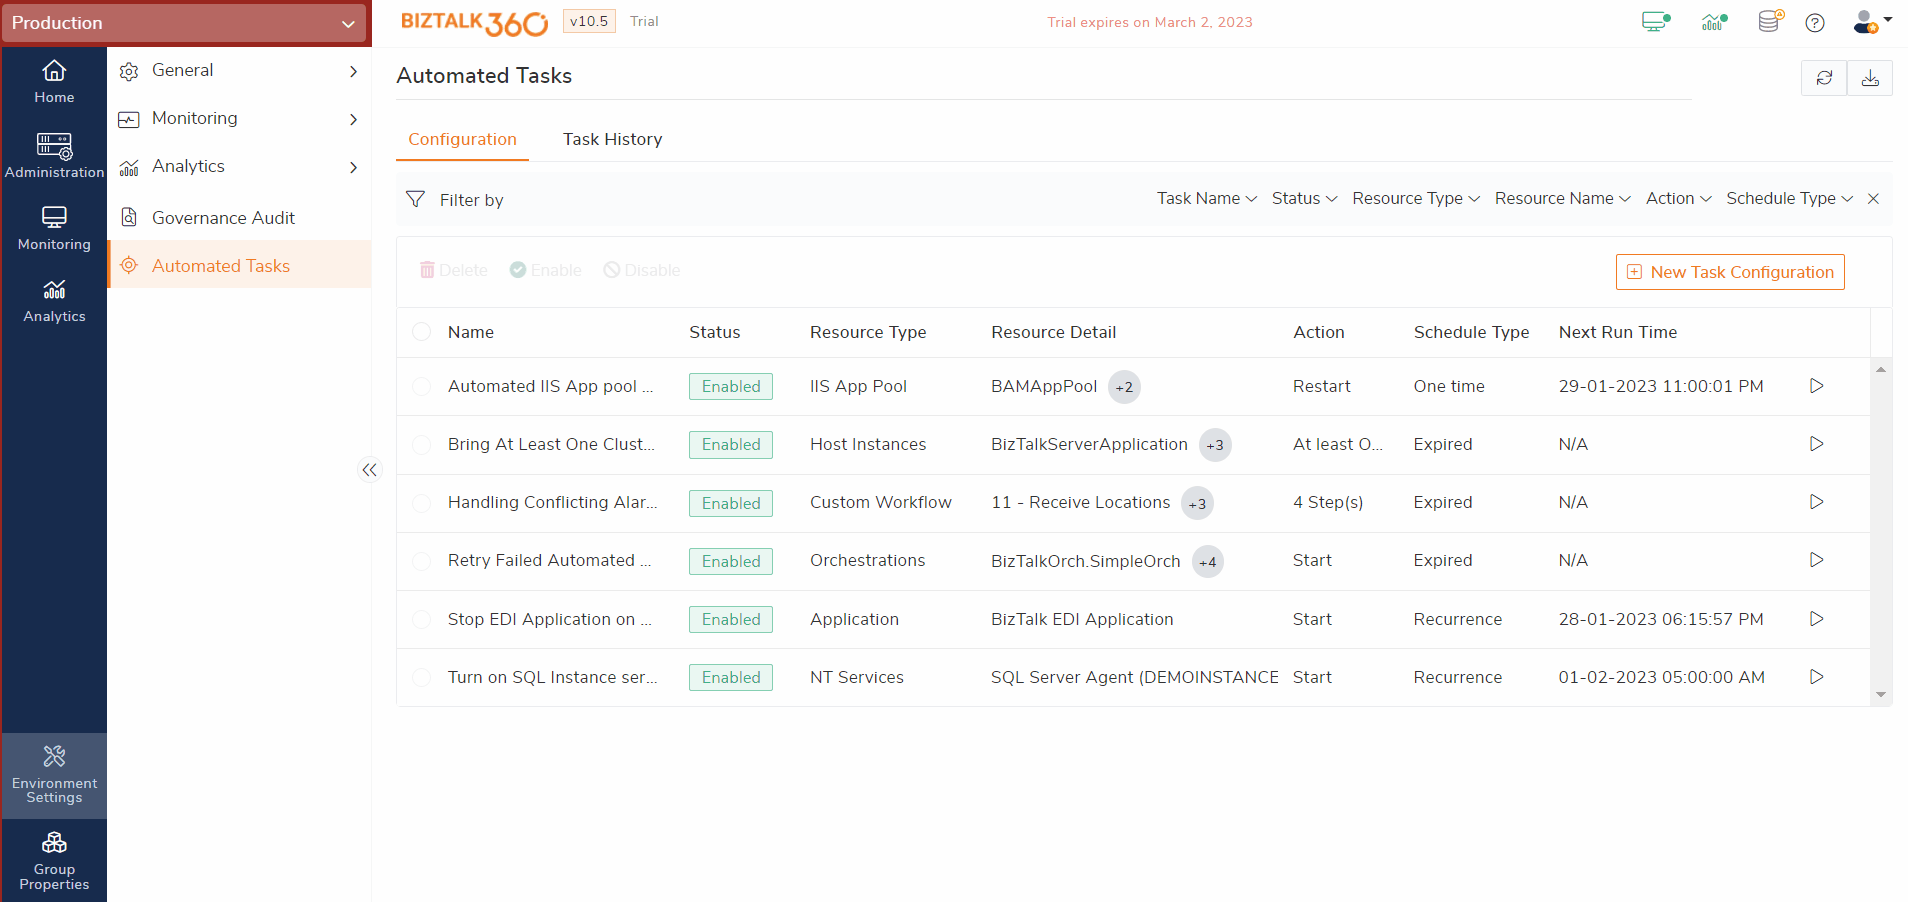
To eliminate the need for manual effort in various BizTalk-related routine actions, we have introduced a feature called “Automated Tasks” in BizTalk360 v10.3. With Automated Tasks, it is very easy to bring “n” number of artifacts or resources to the required state by creating a task in a few clicks. You can also manually trigger the task at any point in time or schedule it to run on specific days. If you’re interested in learning more about automating the operations of BizTalk application ports or host instances and how Automated Tasks helps you during the maintenance period, we recommend reading this series of blogs.
Okay! So, what are we going to talk about in this blog? Here are the key takeaways of this blog.
Not only automating certain state operations will give a big hand in BizTalk deployments, but there are also a lot of other tasks that must be done before and after installation. Things like updating authentication credentials on ports, altering port URIs, installing artifact assemblies and application dependencies to the GAC, creating FILE type send/receive locations on the local file system, and more. Numerous scripting languages can be used to take care of these tasks, yet PowerShell scripts give first-class assistance in dealing with the registry, file system, XML files, and .NET objects. Because of this, BizTalk360 offers the ability to automatically execute PowerShell scripts on both local and remote servers. Let’s see the different ways of creating PowerShell tasks.
The first approach is to just run the script without any artifact actions:

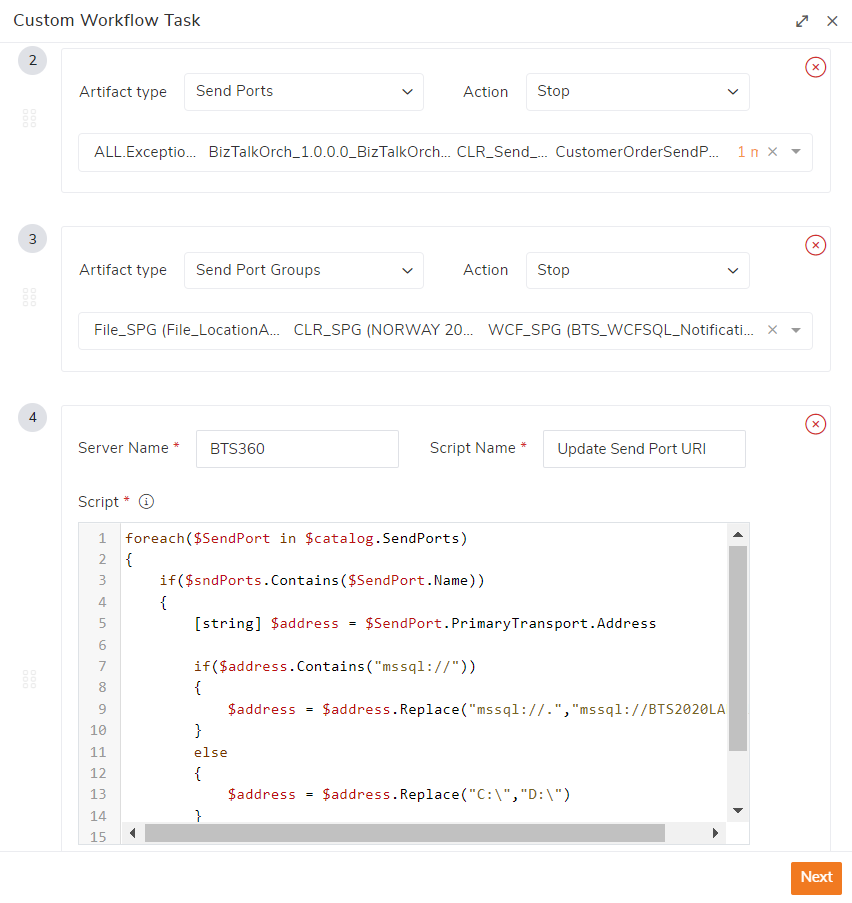
The second option is to execute the script along with artifact actions:
Similarly, you can also execute multiple scripts and artifact actions (maximum of 10) in a single custom workflow task.
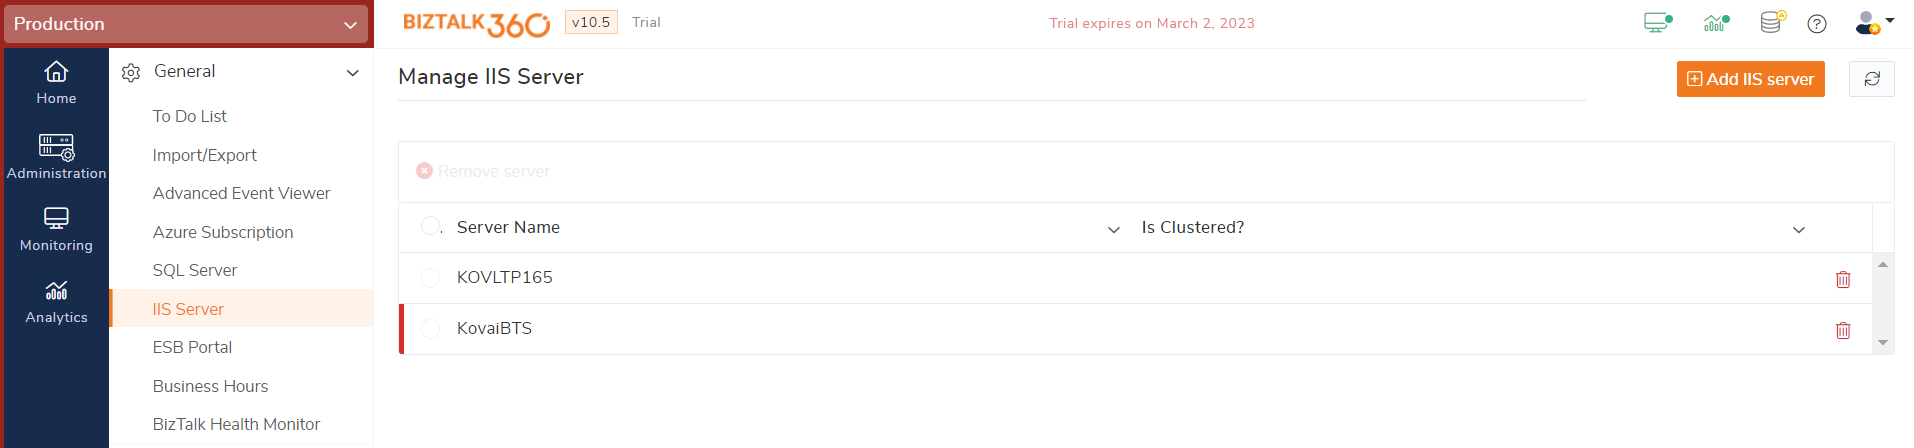
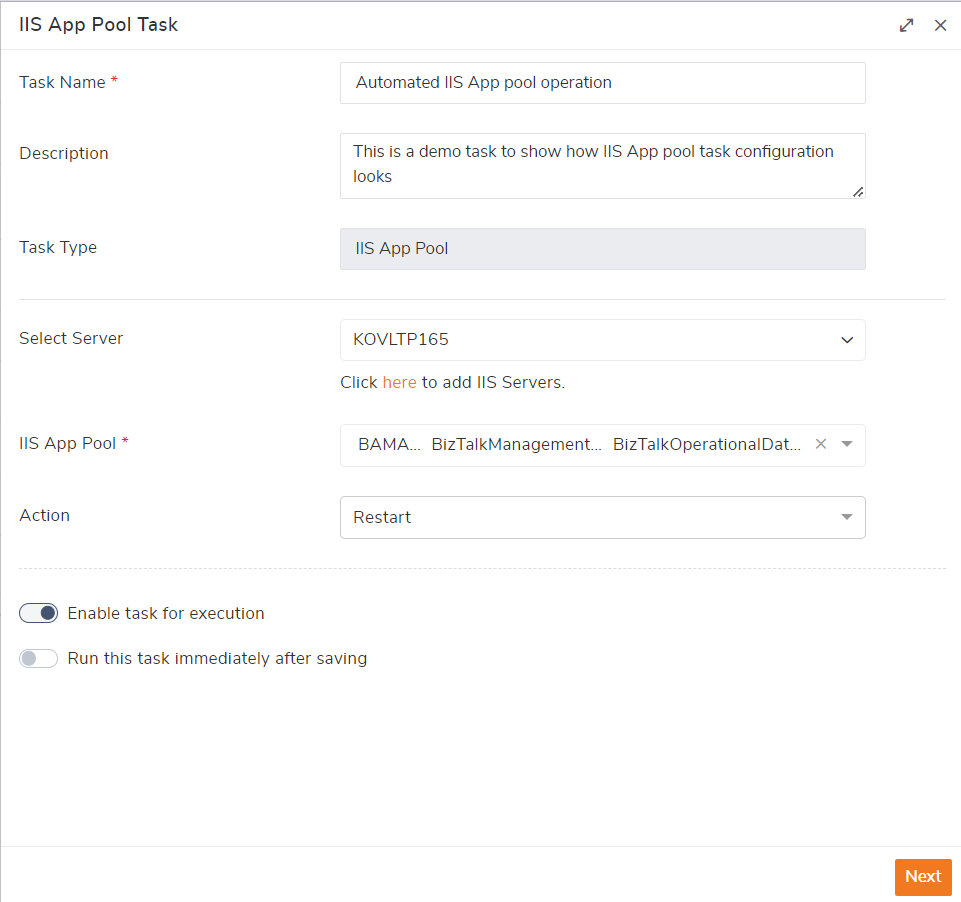
As a BizTalk user, especially one who relies on apps and services that are hosted on IIS, you’ve probably come across a reasonable number of times in a day when you need to restart/recycle an app pool because it’s consuming too many resources on the server or experiencing downtime. One of the coolest things about IIS Automated tasks is that it reduces the time taken in switching between multiple servers to perform app pool actions, in a more user-friendly manner. In BizTalk360, under the “IIS Servers” feature in Environment Settings -> General, you can add the IIS Servers (v7.0 or above) where you want to perform any actions.
Once the servers are added, Automated Tasks will automatically list all the app pools available in the selected server. You can select the required number of app pools and mention the operation that needs to be performed.
These are four actions, you can perform on app pools,
Note: Make sure, the monitoring service account has administrator privileges and has access to connect with the remote machines if you are carrying out PowerShell or IIS tasks on different servers.
Working with Windows NT Services is almost inevitable. The Microsoft Windows operating system relies on it heavily. If you are a BizTalk360 user, then obviously you know how BizTalk360 aids in operating NT services and monitoring their healthy state, as well as the Startup type and Log on as account. Now to fill the gap, we have also brought automated NT services operations to make things easier and quicker. Let’s take a look at creating automated tasks for NT services.
a. Start
b. Stop
c. Resume
d. Pause
e. Restart
f. At least one active (Applicable only for clustered services)
5.Select one or more NT services on which you want to carry out the required action.
6.Specify the schedule to automatically trigger your task daily, weekly, or monthly.
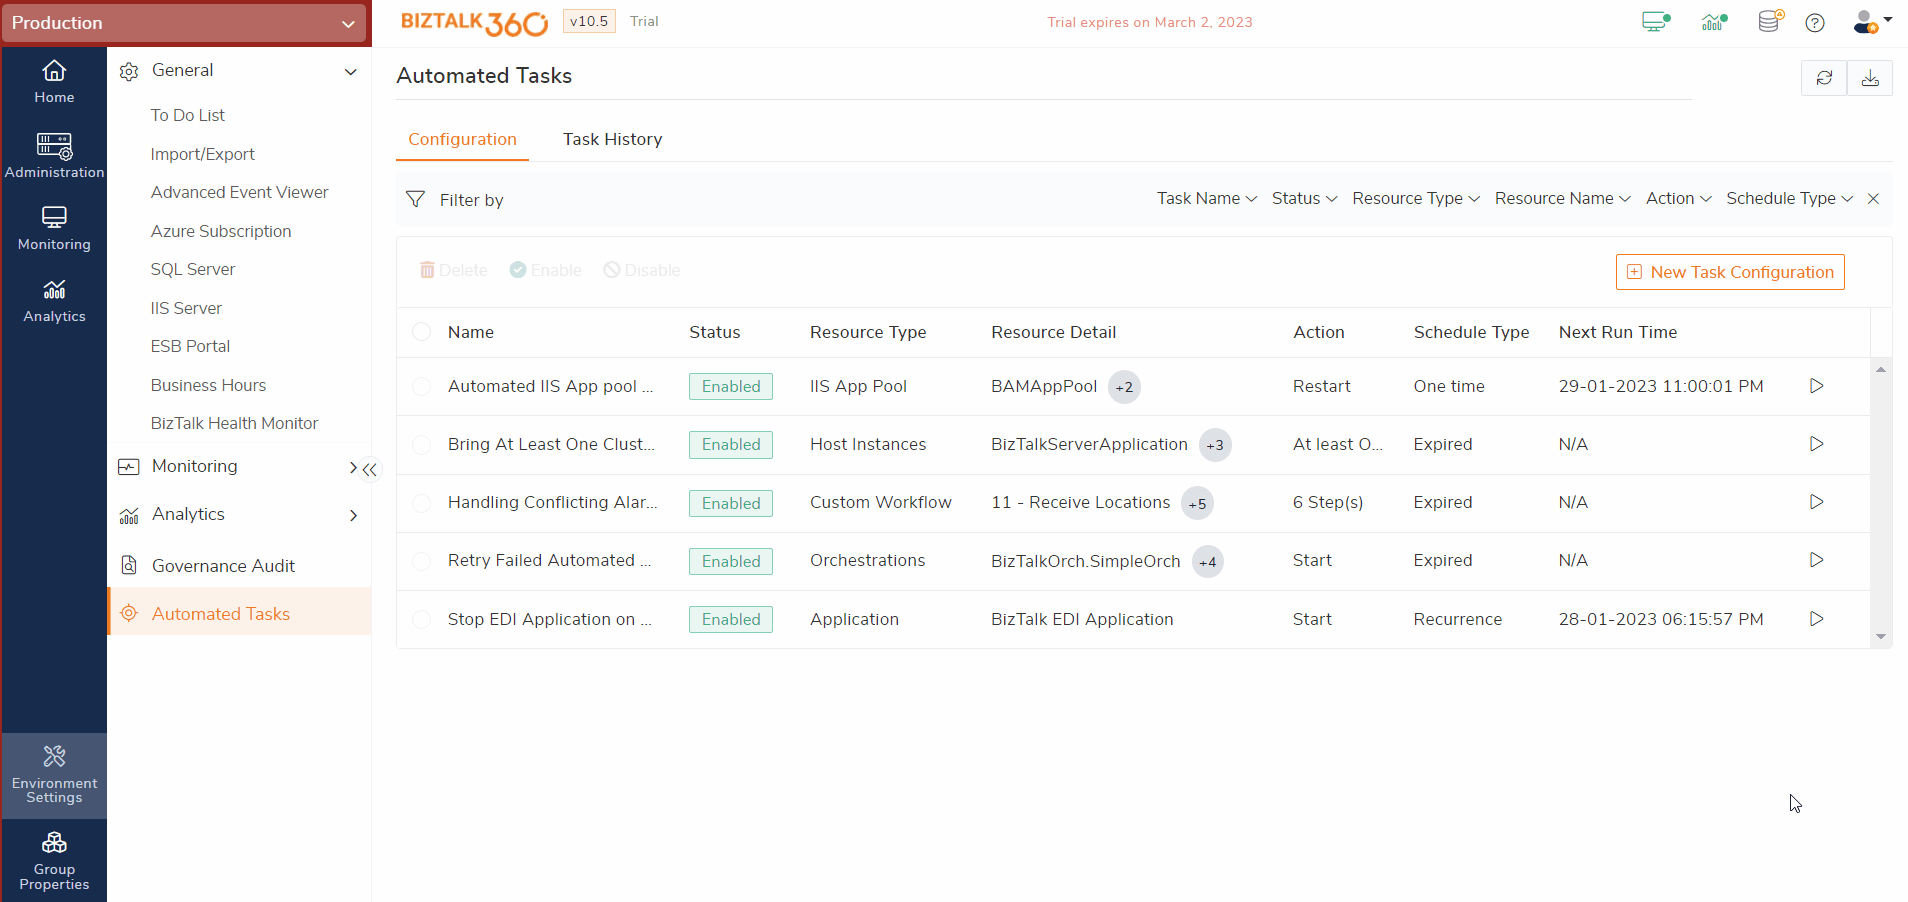
Bonus! Recently, we have been constantly hearing from our customers to support “At least one active” operation for host instances in Automated Tasks. We are happy to say that now we have introduced that as well. From BizTalk360 v10.5, users can create a task to automatically bring the pair of clustered host instances in “At least one active” state. The active host instance in a cluster pair will be started by this action.
It’s impossible to always have everything in perfect harmony, so failure happens! There can be some external factors or environmental issues due to which the task may fail or partially succeed. For example,
So, such kind of failures cannot be considered as critical issues, and retrying the task again (Yup, maybe “Again and Again!”) after some time may result in a successful execution of the task. Furthermore, it is efficient to retry only failed resources and ignore those that have already succeeded.
Let’s say you have created a task to stop 50 orchestrations at the end of business hours but among them, only 20 orchestrations were stopped successfully, and others failed due to some issues. In this case, checking the status of the executed tasks and finding the failed ones and manually retrying the operation on failed ports is a time-consuming and productivity-killing process. To make the manual intervention as less as possible, we have introduced this Retry mechanism.
To make use of this mechanism,
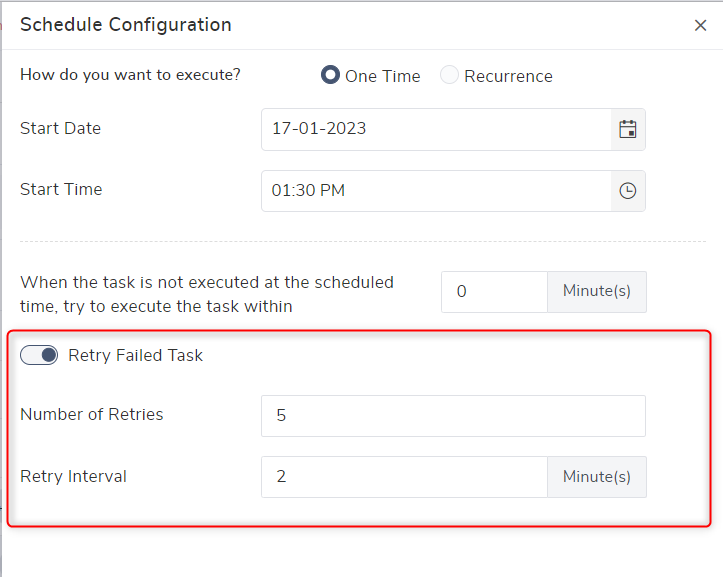
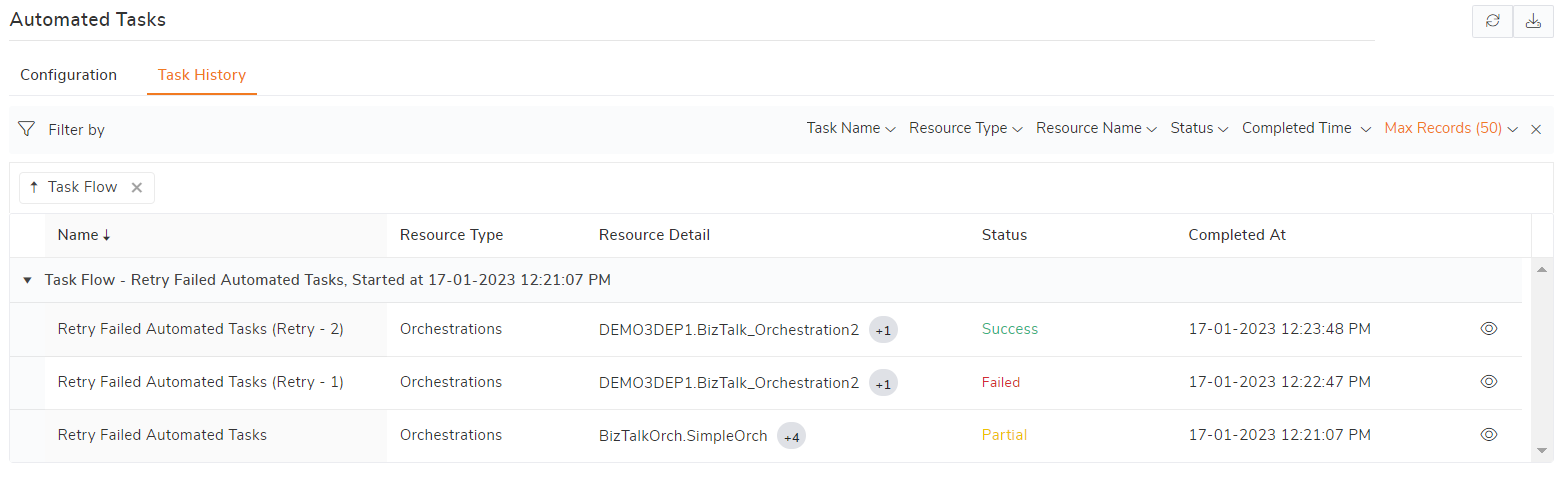
In the above example, whenever a task gets failed then after every 2 minutes BizTalk360 will retry the same task on failed resources until it becomes fully success or reaches the maximum retry attempt. In the task history, you can view the original task details and their retries grouped together.
Note: In a PowerShell task, retry will just re-execute the provided script. It is advisable to enable retry for automated script tasks which doesn’t have any negative impact on re-executing.
Sometimes, you may have created a task to turn off (i.e., Stop / Unenlist) all application ports and host instances in the environment due to any kind of maintenance or deployments. In the same case, you could have alarms in your BizTalk360 environment that keeps on monitoring the same artifacts and host instances are in a healthy state (i.e., Started / Enabled). In such a scenario, after executing that task, users will be bombarded with receiving false alerts, signalling the mapped artifacts are turned off, and auto-corrects will try to bring the artifacts to the mapped state – which is absolutely not what you want in this case.
In previous versions, users had to create a maintenance schedule to stop getting alerts or manually find conflicting alarms then remove their mappings or disable them to prevent a flood of false alerts.
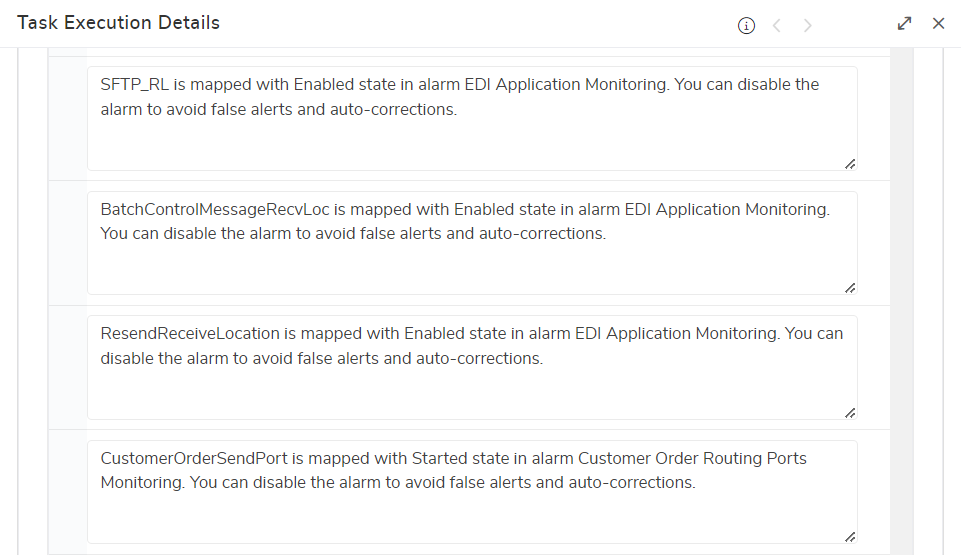
Luckily, that is made even easier now in Automated Tasks, the basic idea here is, whenever you configure a Custom Workflow Task, BizTalk360 will automatically check for the alarms’ mappings that conflict with the task configuration, all you have to do is just simply select the required alarms and include them in task to disable it at the end of the task execution. If you feel the mappings will not affect your process, you can then continue without change.
The following example demonstrates how to add conflicting alarms in a Custom Workflow Task.
The above-mentioned option helps you in avoiding false alerts while creating the task itself. What if you have created the task already and later you created the alarm or have updated the mappings of any existing alarm? Worry not! BizTalk360 will scan for the conflicting alarms that are actively monitoring the artifacts during the time of task execution as well. If there are any alarms, then BizTalk360 will notify you via the configured emails or notification channel as additional information in the task summary. With the help of that information, you can easily find the alarms and disable them! The same information can also be seen in the task history.
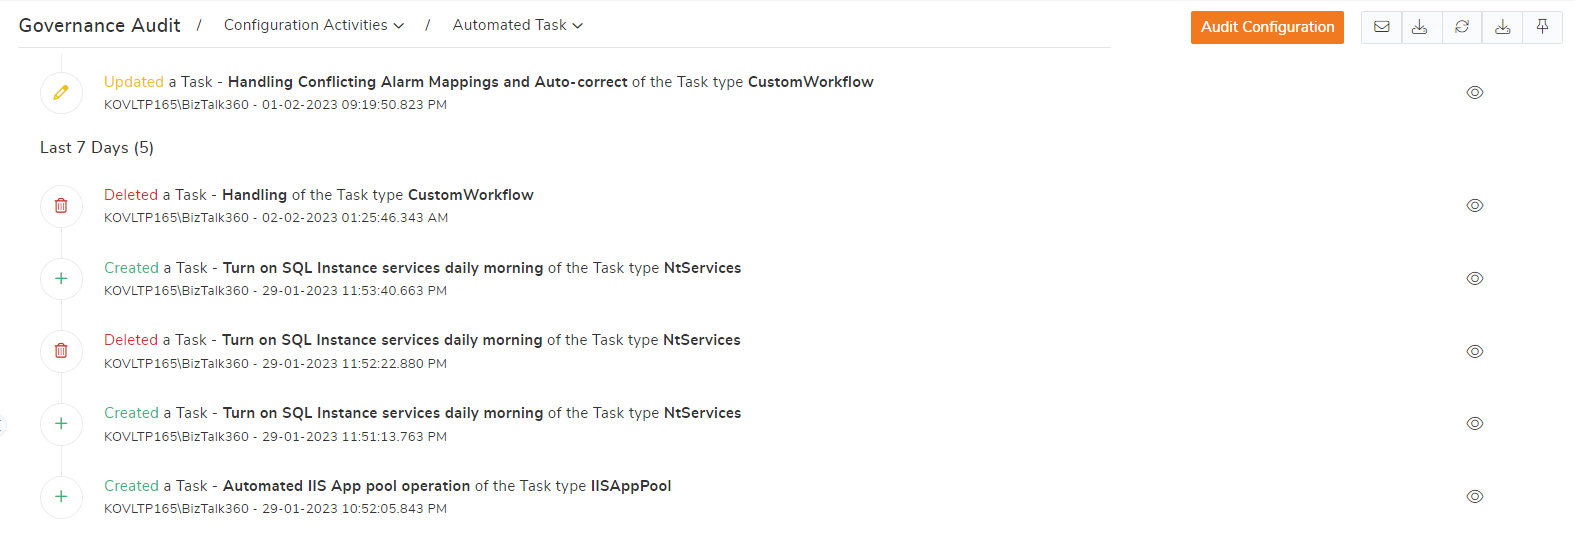
Any product that automates actions must provide a high level of reliability and security. Like a way to say, “Hey! This has happened at this specific time.” BizTalk360 will track and audit every change made to the automated tasks configurations. You can view the details under Governance Audit -> Configurations Activities -> Automated Task. Here you can identify who created the task, what changes were made to the task, and if any task was deleted.
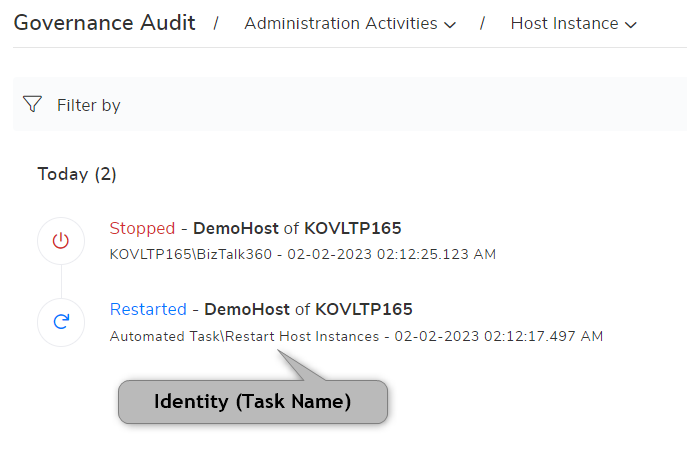
Additionally, you can see an audit of task execution under the respective sections. Say, for example, if a host-instance task has been executed, you can view the audit of that operation in Governance Audit -> Administration Activities -> Host Instance. Here the identity of the operation will help you find whether the operation was done by an automated task or any user.
We hope that the new features and capabilities added to Automated Tasks will be of great help to our customers in their different business scenarios. With the help of this, users can focus on high-value tasks rather than spending a lot of time on mundane and repetitive tasks. You can get a glimpse of other brand-new features and enhancements released for the year 2022 here.
If you are new to BizTalk360 and curious about finding out how it will meet your business needs, start your free trial and sign-up for a personalized walk-through.