eldert
Author
Published on : Apr 11, 2017
Category : Microsoft Azure
 This class will be sent to in the message to IoT Hub, and will contain the readings from our engine and the properties to identify for which engine the message was created.
public class EngineReading
{
    public string ShipName;
    public string SerialNumber;
    public DateTime CreatedDateTime;
    public int RPM;
    public int Temperature;
}
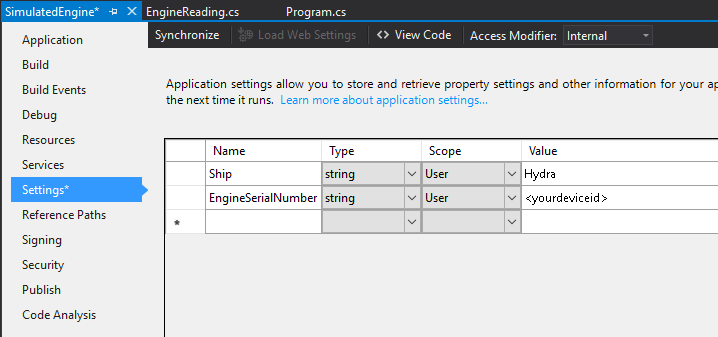
To make it easy to change the serial number and the name of the ship, we will store these in the settings of the application.
 We will now create the method which will create some dummy engine reading (which in a real life scenario would of course be read from your actual sensors), and send this to IoT Hub.
private async static void SendEngineReading(object state)
{
	// Create dummy reading
	var engineReading = new EngineReading
	{
		SerialNumber = Settings.Default.EngineSerialNumber,
		ShipName = Settings.Default.Ship,
		CreatedDateTime = DateTime.Now,
		RPM = 500 + new Random().Next(-30, 30),
		Temperature = 450 + new Random().Next(-50, 70)
	};

	// Send message to IoT Hub
	await client.SendEventAsync(new Message(Encoding.UTF8.GetBytes(JsonConvert.SerializeObject(engineReading))));
}
And finally we will need to add a timer which triggers sending the message. For this we will add the following line to the Main method, just after the SetDesiredPropertyUpdateCallback call we created in the first blog post.
var timer = new Timer(SendEngineReading, null, 0, 5000);
private async static void SendEngineReading(object state)
{
    // Create dummy reading
    var engineReading = new EngineReading
    {
        SerialNumber = Settings.Default.EngineSerialNumber,
        ShipName = Settings.Default.Ship,
        CreatedDateTime = DateTime.Now,
        RPM = 500 + new Random().Next(-30, 30),
        Temperature = 450 + new Random().Next(-50, 70)
    };

    var messageToSend = new Message(Encoding.UTF8.GetBytes(JsonConvert.SerializeObject(engineReading)));

    if (engineReading.Temperature > maximumTemperature)
    {
        // Add alert property
        messageToSend.Properties.Add("alert", "HighTemperature");
    }

    // Send message to IoT Hub
    await client.SendEventAsync(messageToSend);
}
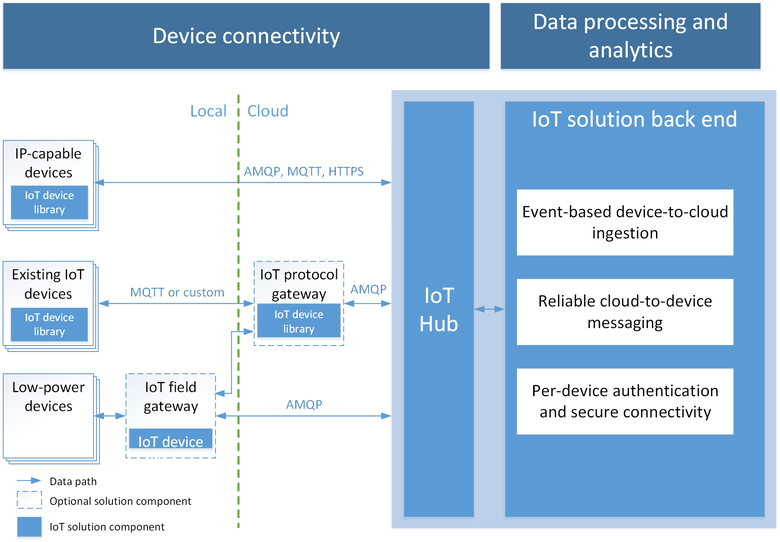
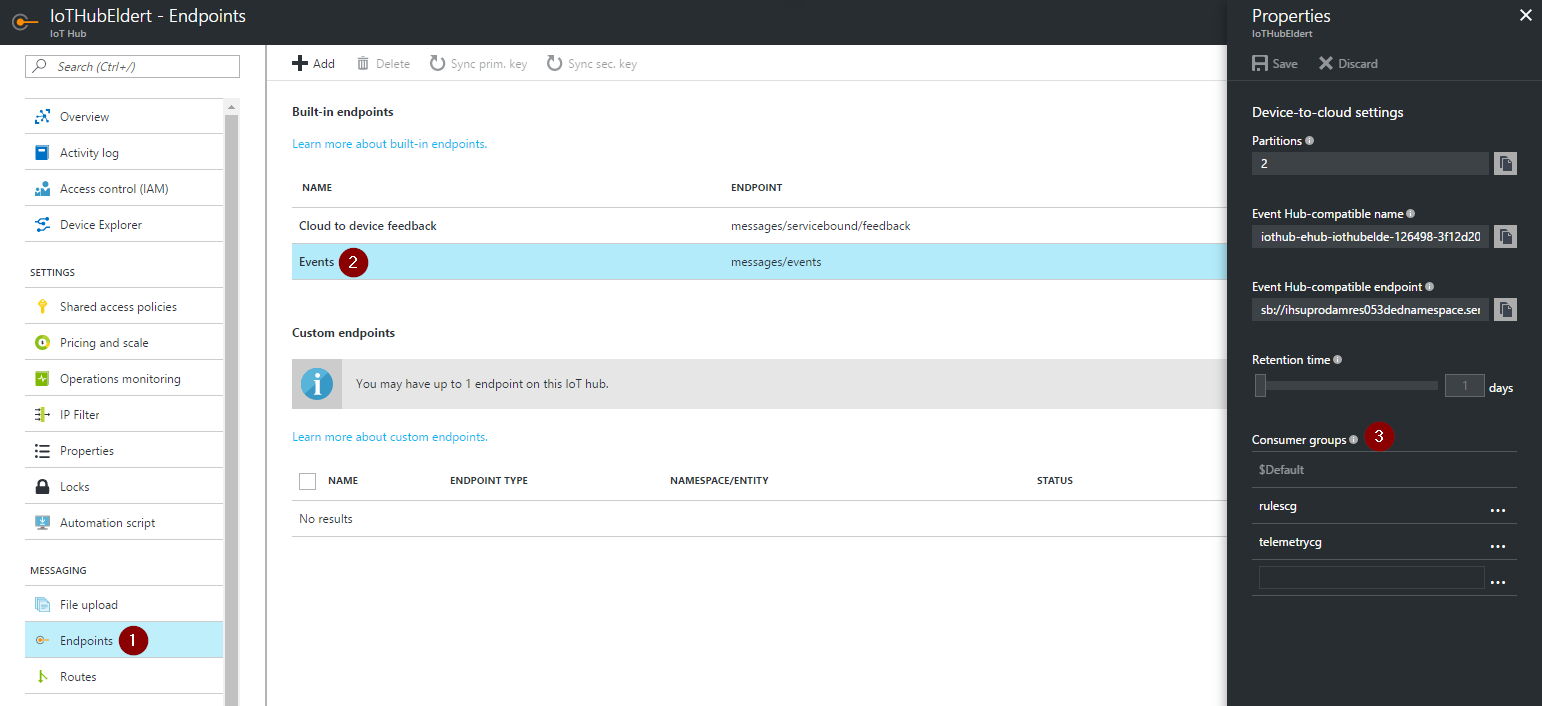
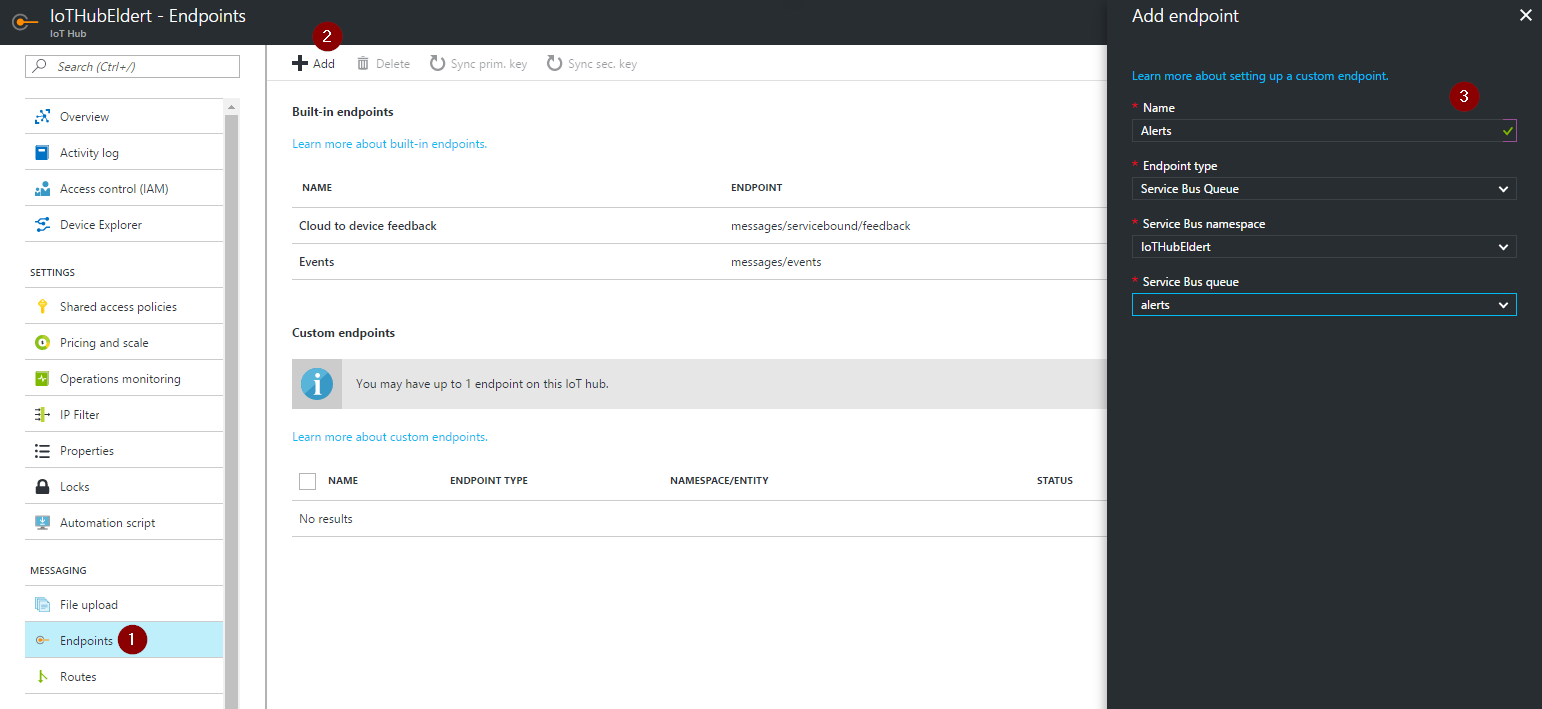
This will make sure a property is added in case of the engine’s temperature being too high, so lets add a route to IoT Hub to send these messages to a Service Bus Queue (as indicated in the prerequisites). We will first need to create a custom endpoint to our queue.
 Once the endpoint is created, we will add a route which uses the following filter to send specific messages to this new endpoint.
alert="HighTemperature"
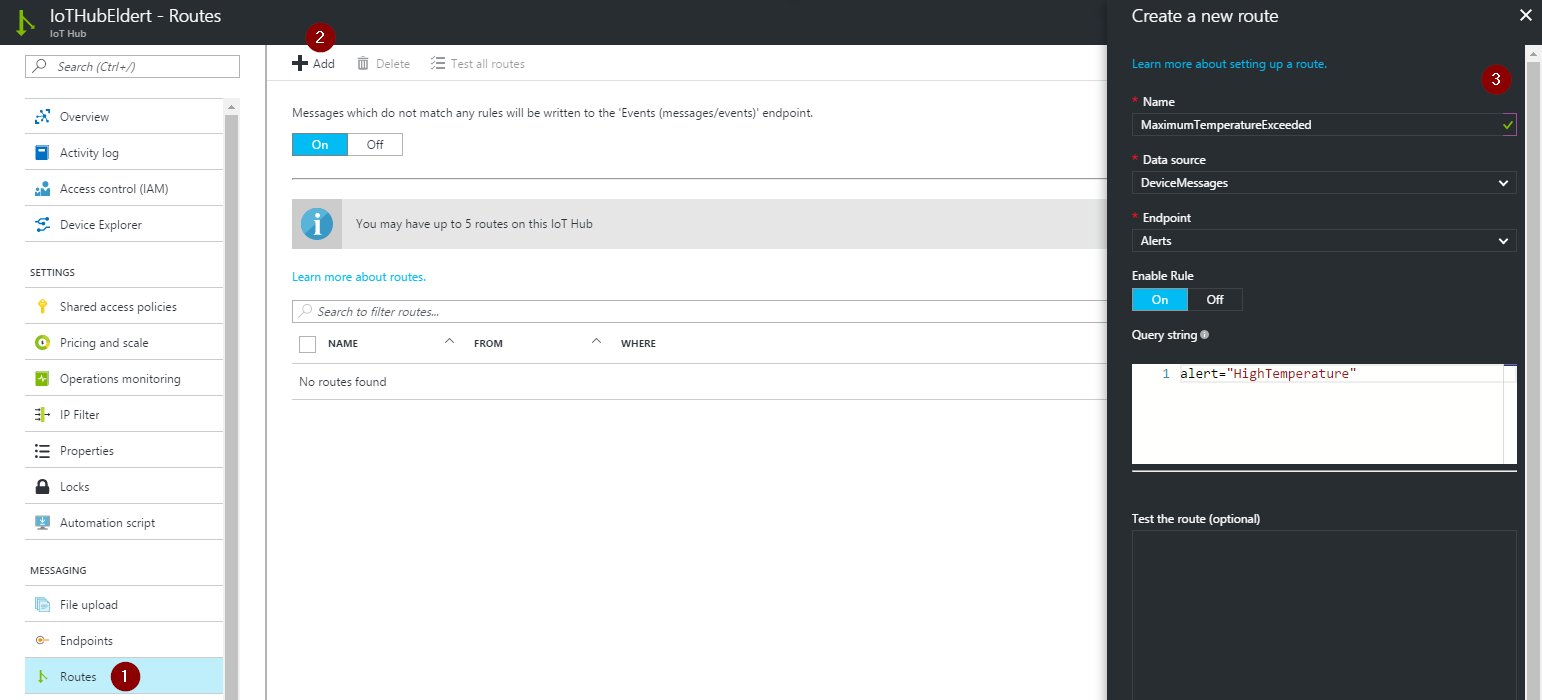 Our messages with the alert will now be routed to the Service Bus Queue, where we can pick it up for further processing.
private static async void UpdateReportedProperties(Guid configId, int version, string status)
{
    var reportedProperties = new TwinCollection
    {
        ["firmwareConfig"] = new
        {
            configId = configId,
            version = version,
            status = status
        }
    };
    await client.UpdateReportedPropertiesAsync(reportedProperties);
}
Next we will create a new method to retrieve the desired properties for the firmware, simulate updating the firmware, and reported properties to report the progress to the backend. To simulate a long running process we will add a delay, to show how we can use different statuses to let our backend know how much progress has been made.
private static async void UpdateFirmware()
{
    var deviceTwin = await client.GetTwinAsync();

    int firmwareVersion = deviceTwin.Properties.Desired["firmwareConfig"]["firmwareVersion"];
    string downloadLink = deviceTwin.Properties.Desired["firmwareConfig"]["downloadLink"];
    Guid configId = deviceTwin.Properties.Desired["firmwareConfig"]["configId"];

    // Make sure desired properties section exists
    if (!deviceTwin.Properties.Reported.Contains("firmwareConfig"))
    {
        UpdateReportedProperties(Guid.Empty, 0, "Initial");
        deviceTwin = await client.GetTwinAsync();
    }

    // Check if desired properties are updated
    if (deviceTwin.Properties.Reported["firmwareConfig"]["configId"] == configId)
    {
        return;
    }

    // Simulate firmware upgrade, reporting back the progress
    UpdateReportedProperties(configId, firmwareVersion, "Downloading");
    Thread.Sleep(10000);
    UpdateReportedProperties(configId, firmwareVersion, "Applying");
    Thread.Sleep(20000);
    UpdateReportedProperties(configId, firmwareVersion, "Success");
}
Since an update of the desired properties does not trigger the callback in case the device was offline when the update was done, we should do this check every time the application starts, so make dure to call this new method from the Main method. Since we will also want to call this method in case the callback does get triggered, which happens in case the desired properties get updated when the device is online, we will change the DesiredPropertyUpdated to the following.
private static Task DesiredPropertyUpdated(TwinCollection desiredProperties, object userContext)
{
    // Get maximum temperature
    maximumTemperature = desiredProperties["temperatureConfig"]["maximumTemperature"];
    UpdateFirmware();
    return null;
}
Next go to the EngineManagement project we created in the first blog post of this series, and update the form to the following.
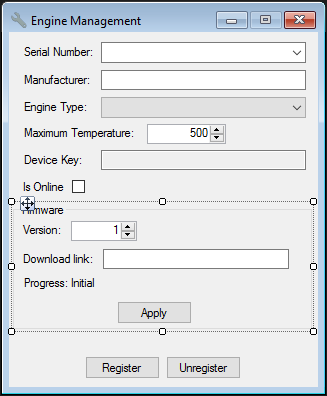 For the event handler of the Apply button, we will implement the following method, which updates the desired properties, and tracks the progress.
private async void ButtonApplyFirmware_Click(object sender, EventArgs e)
{
    var deviceTwin = await registry.GetTwinAsync(comboBoxSerialNumber.Text);

    if (deviceTwin == null)
    {
        groupBoxFirmware.Enabled = false;
        labelProgress.Text = "Invalid device!";
    }

    var configId = Guid.NewGuid();

    // Create patch which updates the device twin
    var patch = new
    {
        properties = new
        {
            desired = new
            {
                // Set firmware
                firmwareConfig = new
                {
                    configId = configId,
                    firmwareVersion = numericUpDownVersion.Value,
                    downloadLink = textBoxDownloadLink.Text
                }
            }
        }
    };

    await registry.UpdateTwinAsync(comboBoxSerialNumber.Text, JsonConvert.SerializeObject(patch), deviceTwin.ETag);

    while (true)
    {
        if (deviceTwin.Properties.Reported.Contains("firmwareConfig")
            && deviceTwin.Properties.Reported["firmwareConfig"]["configId"] == configId)
        {
            var status = deviceTwin.Properties.Reported["firmwareConfig"]["status"];
            labelProgress.Text = $"Progress: {status}";

            if(status == "Success")
            {
                break;
            }
        }

        Thread.Sleep(1000);
    }
}
private static async void UploadLogFile()
{
    using (var sourceData = new FileStream(logFilePath, FileMode.Open))
    {
        await client.UploadToBlobAsync($"{DateTime.Now.ToString("yyyyMMddHHmmss")}.log", sourceData);
    }
}
Now update the UpdateFirmware method to do the actual logging, and call the UploadLogFile method once done to upload the log.
private static async void UpdateFirmware()
{
    var deviceTwin = await client.GetTwinAsync();

    int firmwareVersion = deviceTwin.Properties.Desired["firmwareConfig"]["firmwareVersion"];
    string downloadLink = deviceTwin.Properties.Desired["firmwareConfig"]["downloadLink"];
    Guid configId = deviceTwin.Properties.Desired["firmwareConfig"]["configId"];

    // Make sure desired properties section exists
    if (!deviceTwin.Properties.Reported.Contains("firmwareConfig"))
    {
        UpdateReportedProperties(Guid.Empty, 0, "Initial");
        deviceTwin = await client.GetTwinAsync();
    }

    // Check if desired properties are updated
    if (deviceTwin.Properties.Reported["firmwareConfig"]["configId"] == configId)
    {
        return;
    }

    // Simulate firmware upgrade, reporting back the progress
    File.WriteAllText(logFilePath, $"{DateTime.Now}: Download from {downloadLink} started{Environment.NewLine}");
    UpdateReportedProperties(configId, firmwareVersion, "Downloading");
    Thread.Sleep(10000);
    File.AppendAllText(logFilePath, $"{DateTime.Now}: Download from {downloadLink} finished{Environment.NewLine}");
    File.AppendAllText(logFilePath, $"{DateTime.Now}: Applying firmware update{Environment.NewLine}");
    UpdateReportedProperties(configId, firmwareVersion, "Applying");
    Thread.Sleep(20000);
    File.AppendAllText(logFilePath, $"{DateTime.Now}: Firmware update finished successfully");
    UpdateReportedProperties(configId, firmwareVersion, "Success");

    UploadLogFile();
}