Recently I had to integrate with Oracle db using the BizTalk 2006 Oracle adapter (Note: just our vanilla Oracle adapter, not the WCF one). I experience huge challenge setting it up on a Windows 2003 64 bit machine. It’s mainly around getting the correct Oracle drivers, using the 64 bit version of ODBC data source interface, giving permission to certain folders, etc.
We had to do this on a production server on limited window, so its crucial to get the steps spot on. Here are the steps that?s required.
- Download Oracle Data Access Component
- Install Oracle Data Access Component
- Create/Configure tnsnames.ora file will connection details
- Create a System DSN and test the connection
- Install Oracle Adapter
- Configure Oracle Adapter
- Give permission to Oracle Installation folder
- Restart Host Instances
- Configure a Receive Port/Receive Location
1 Download Oracle Data Access Component
The first step in configuring the BizTalk 2006 Oracle adapter is to make sure the underlying Oracle ODAC components are correctly configured. You can download the required files from the following location
http://www.oracle.com/technetwork/database/windows/downloads/utilsoft-087491.html
The page will display various links, with various flavours. The one we are interested in (the one we tested successfully) is
Download the Oracle Universal Installer version – ODAC112012.zip
The key thing to look out for in the list is the “Oracle ODBC Driver 11.2.0.1.0”
The other important bit here is not to confuse too much with the 64 bit and 32 bit versions. You
only need 32 bit version of the ODAC installer.
2 Install Oracle Data Access Component
Once you have downloaded the ODAC112012.zip (around 270mb), extract the content and identify setup.exe file. Double click the file to start the installation process.
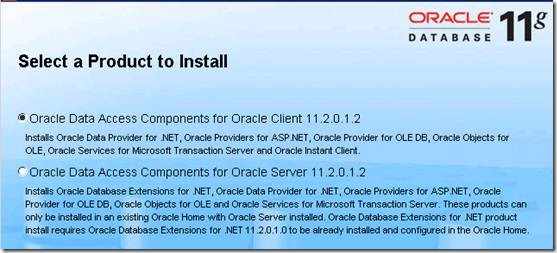
On the first screen select the option “Oracle Data Access Components for Oracle Client 11.2.0.1.2”
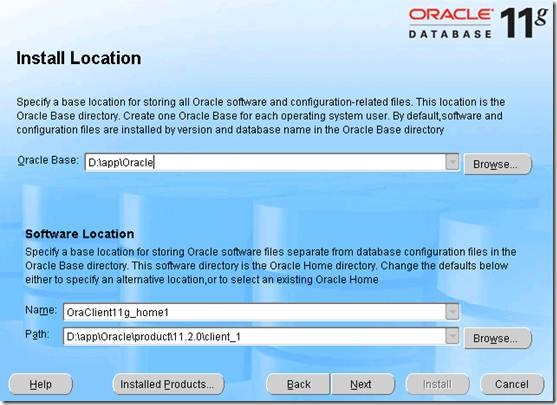
In the next screen you need to specify the path, by default it puts the current user name at the end. Just replace the username with “Oracle”
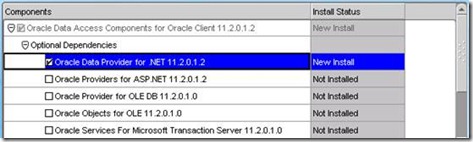
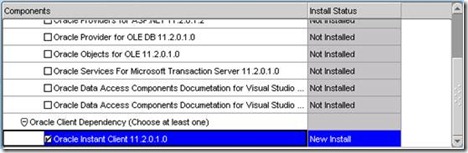
In the component selection screen, select only the following components
- Oracle Data Provider for .NET 11.2.0.1.2, and
- Oracle Instant Client 11.2.0.1.0
Note: While unselecting you need to do it from bottom up, else you will get error about dependencies.
3 Create/Configure tnsnames.ora file will connection details
Once the Oracle ODAC components are successfully installed, you need to configure the tnsnames.ora file (found under your install folder d:appOracleNetworkadmin) with the environment specific connection string. Example:
ORACLEWEB =
(DESCRIPTION =
(ADDRESS = (PROTOCOL = TCP)(HOST =
yourservername)(PORT = 1523))
(CONNECT_DATA =
(SERVER = DEDICATED)
(SERVICE_NAME = FILEMFU1)
)
)
Oracle DBA’s should be able to provide these details.
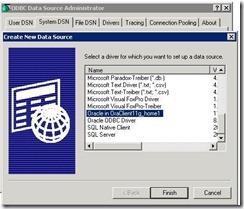
4 Create a System DSN and test the connection
Next we need to create a system DSN to connect to the oracle database. On a 64 bit system it?s important to use the 64bit or Wow64 enabled ODBC datasources interface instead of using the standard one present under
Administrative ToolsDataSources ODBC.
In order to do that, open the odbccad32 application found under the following location
C:WINDOWSSysWOW64odbcad32.exe
Navigate to System DSN tab and click “Add” button. Then Select “Oracle in OraClient11g_home1” and click finish
In the next screen, Set
Data Source Name = ORACLEWEB
TNS Service Name = ORACLEWEB (This should correspond to the name provided in the tnsnames.ora file)
UserID = <<environment specifi>>
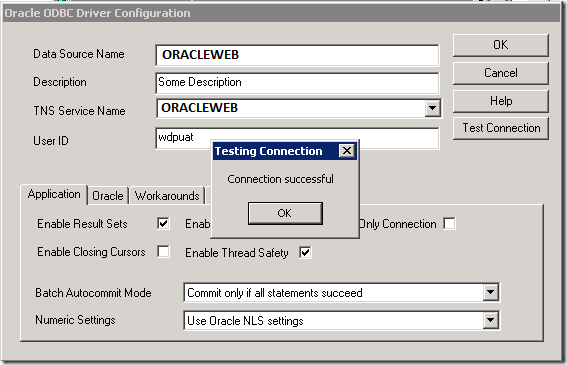
Then click the “Test Connection” button, provide password and make sure the connection is successful.
5 Install Oracle Adapter
Once establishing the successful oracle connection from the BizTalk machine, the next step is to install the BizTalk 2006 Oracle adapter. The installer files are present in a separate CD called “Microsoft BizTalk Server Adapters for Enterprise”, if you can?t find the CD you can download it from MSDN using the subscription account.
Once downloaded, open the setup.exe file and select “Install Microsoft BizTalk adapters for Enterprise Application” link.
In the next screen, only select the “Oralce? Database” (not the Oracle? E-Business Suite) and make all other options disabled.
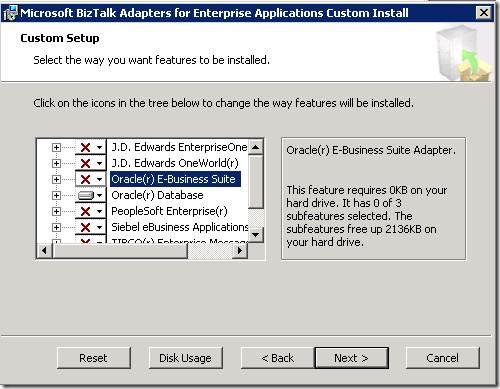
Follow the rest of wizard with standard steps and finish the installation.
6 Configure Oracle Adapter
Once the oracle adapter setup is completed, open up BizTalk Administration console and navigate to Platform SettingsAdapters, right click and select “New”
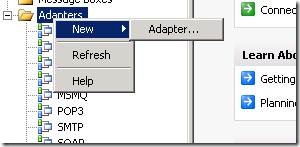
In the new window, enter “OralceDB” for name and select “Oracle? Database” from the drop down box as shown below:
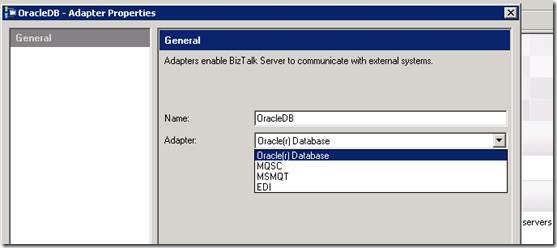
Click OK.
7 Give permission to Oracle Installation folder
Navigate to the oracle ODAC installation folder ex: “D:appOracle” in the windows explorer. Right-click and select Security. Add the service account user name under which the
BizTalk host instance is running and provide full control
8 Restart Host Instances
Make sure you restart the required host instances. Note: There is
no requirement to create a 32 bit host/host instances.
9 Configure a Receive Port/Receive Location
You can test the configuration by creating a new Receive Port, Receive Location.
Open “BizTalk Application 1” and
- Navigate to Receive Port, right click and select “New – One-Way Receive Port”, Name it “Oracle Test”.
- Select “Receive Location” tab and click “New”, Name it “Oracle Test”
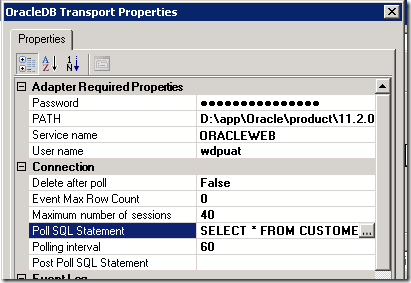
- Select “Oracle DB” from the Type combo box and click “Configure”. You need to configure 5 main values
- Path: Point to “D:appOracleproduct11.2.0client_1bin”
- Service Name: System DSN name configured earlier
- User Name:
- Password:
- Poll SQL Statement
As shown below:
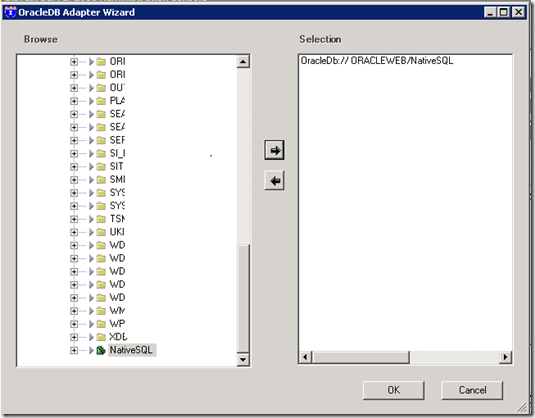
Click ?Apply? and then ?OK?. Click the ?Configure? button again and this time click on the ?Manage Events? option, which will pop up a new window. On LHS navigate to ?Native SQL?.
Note: If you are able to see the LHS expand as shown below, then it a sign showing everything configured correctly.
Click “OK” all the way through, and enable the “Receive Location”. After a while you should see some messages coming into BizTalk server and gets suspended (since there are no subscribers). But this will just prove the oracle configuration is successful.