Introduction
With Enterprise integration pack, comes the ability to create logic apps which can receive and send EDI Messages over AS2 protocol. The AS2 protocol relies on X.509 certificates for signing and encryption. If you have used the AS2 send and receive pipelines in BizTalk server and configured the Trading Partner Agreements with public and private certificates, you would probably agree that this is a complicated topic and many a time we struggled to test encryption and signing scenarios end to end. In this article, we will create an end to end scenario to send EDI messages from BizTalk Server to Logic Apps over AS2 using self-signed certificates for encryption and signing.
You can download this article as a PDF document
Download now.
Scenario
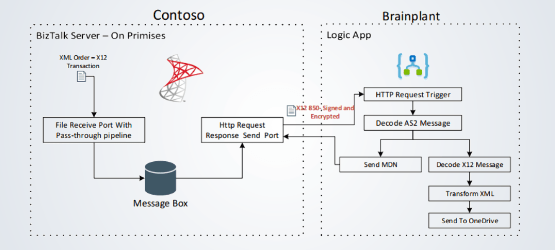
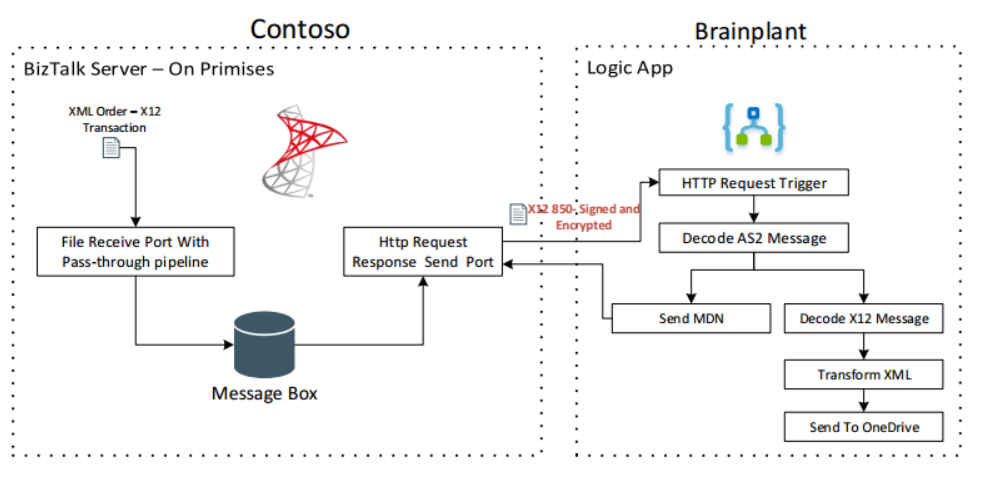
We will be making use of the two fictional companies Contoso and Brainplant. Contoso is hosting the BizTalk Server and Brainplant is hosting a B2B Logic App to receive Orders. Contoso sends encrypted and signed Order messages in X12 format over AS2 to Brainplant’s Order Processing Logic App as shown in the picture below.
Creating self-signed certificates
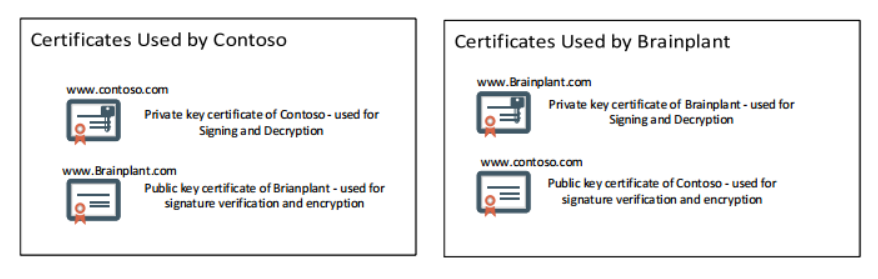
For our scenario, we need to create two self-signed certificates, One for Contoso and another for Brainplant. Each company will use their private key certificate for signing and other company’s public key certificate for encryption as shown in the picture below.
This means, we need to create private and public key pairs for both the companies and share the public key with each other. You can use use
makecert.exe to create self-signed certificates. Below are the command lines used to create these certificates. For more information on the makecert tool, refer the MSDN documentation,
https://msdn.microsoft.com/en-us/library/windows/desktop/aa386968(v=vs.85).aspx
| makecert -r -pe -n “CN=www.Contoso.com” -b 03/24/2017 -e 03/23/2036 -eku 1.3.6.1.5.5.7.3.1 -ss my “Contoso.cer” -sr currentuser -sky exchange -sp “Microsoft RSA SChannel Cryptographic Provider” -sy 12 -a “sha1” -nscp
makecert -r -pe -n “CN=www.Brainplant.com” -b 03/24/2017 -e 03/23/2036 -eku 1.3.6.1.5.5.7.3.1 -ss my “brainplant.cer” -sr currentuser -sky exchange -sp “Microsoft RSA SChannel Cryptographic Provider” -sy 12 -a “sha1” -nscp |
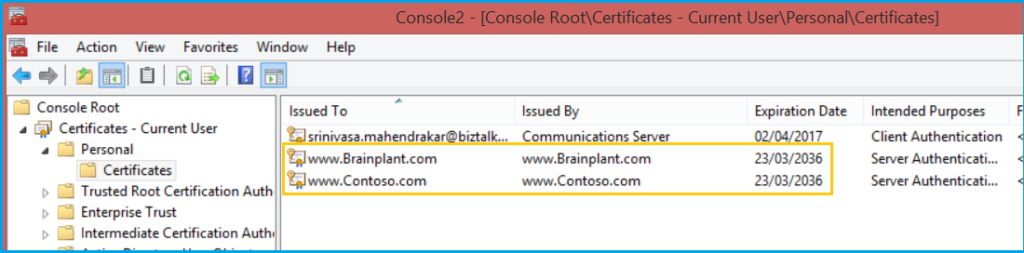
After executing these commands in your local box, you’ve got two private key certificates in the current user Personal store as shown in the picture below.
Now we need to export them into private and public key files.
Exporting certificates
- Export the certificate Brainplant.com to a Brainplant.pfx private key file .
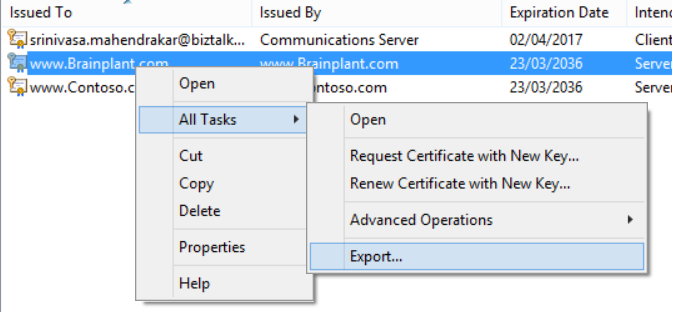
- Export the certificate Contoso.com to a Contoso.pfx private key file
- Export the certificate Brainplant.com to a Brainplant.cer public key file
- Export the certificate Contoso.com to a Contoso.cer public key file
[adrotate banner=”7″]
Uploading private key certificate to Azure Key vault
We can make a private key certificate available to Azure resources such as Logic Apps by storing it into Azure Key Vault. In our scenario, we need to store Brainplant.pfx in the Azure key vault. Once we store the certificate in key vault, we need to provide access to a service principle, which in our case is Logic Apps. Below are the steps involved in achieving this.
- Create a new Azure Key Vault from the Azure portal and name it “DemoCertsAzureKeyVault”
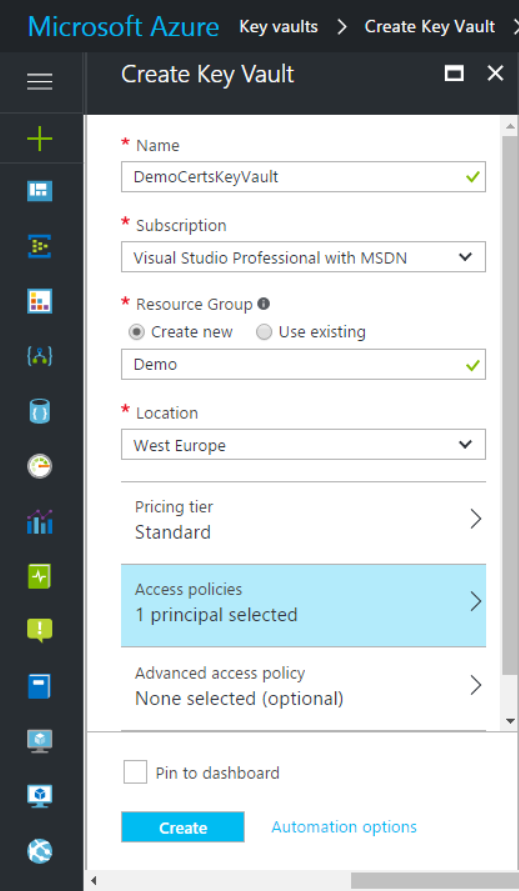
- Under Access policies, select Logic Apps service principal
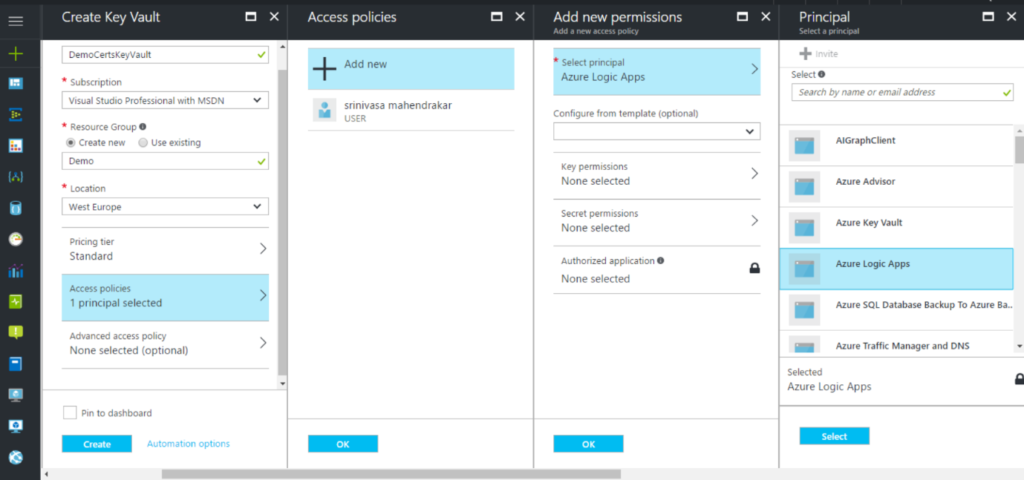
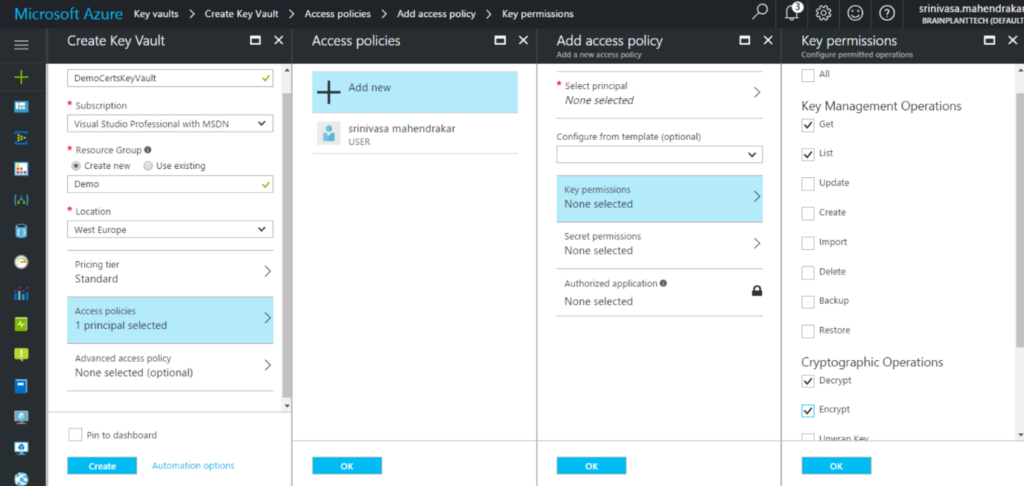
- Select Get, List, Encrypt, Decrypt, Sign and Verify access to service principle.
- Once the Key vault is successfully deployed, select keys in overview page.
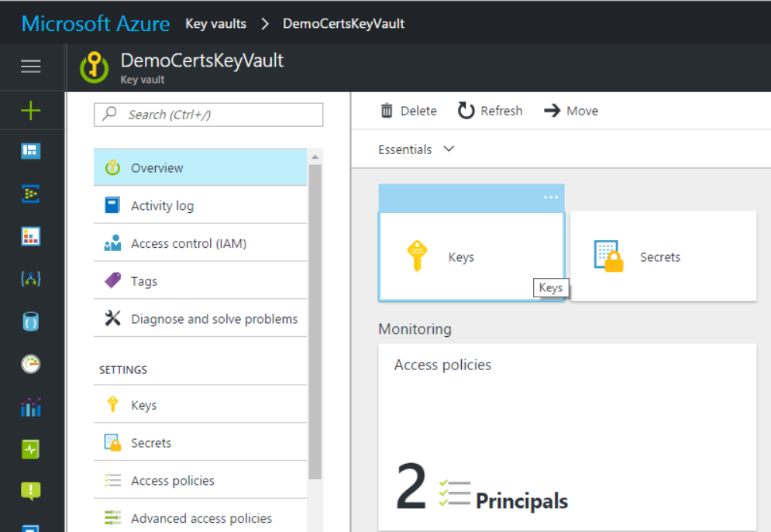
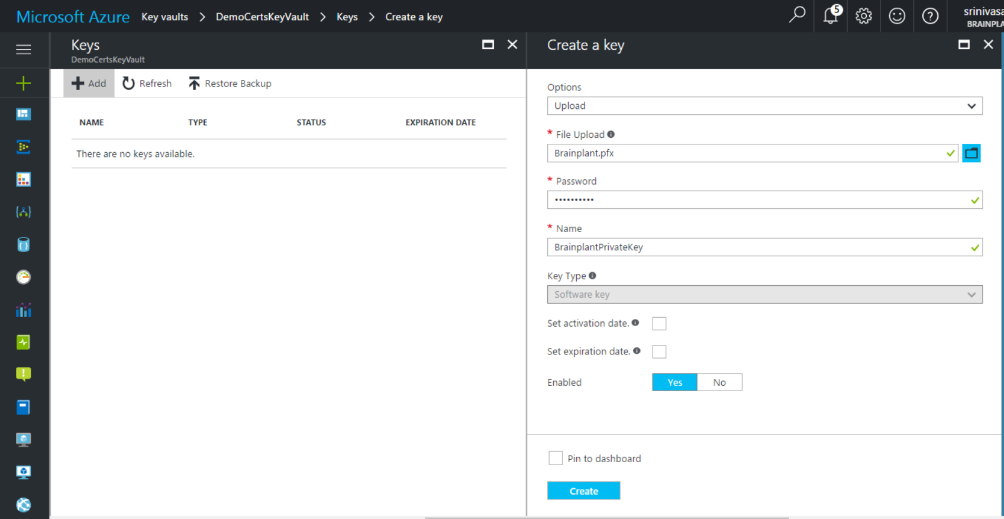
- Add a new key to hold the Brainplant.pfx file and name it as “brainplantPrivateKey”.
Adding artefacts to Integration Account
To use the B2B features in logic apps, we need to create an Integration Account. To know how to create an integration account use the documentation
Creating an integration account. Below are the artefacts that we need to add to integration account. Some of the artefact mentioned can be downloaded from the GitHub location
https://github.com/brainplant/UsingCertificatesInLogicApps
| Artefact Name |
Explanation |
| X12_00401_850.xsd |
This is a schema which will be used by logic app to decode the X12 messages received from Contoso. |
| OrderFile.xsd |
This is a XML order schema file to which the X12 message will be transformed to. |
| Inbound4010850
_to_OrderFile.xsl |
This is an XSL file used to transform the X12 order transaction to custom Order format. This has to be added to Maps in an integration account. |
| Brainplant’s Private key certificate |
=>Click on add certificate, and select the key vault and key which we created previously.
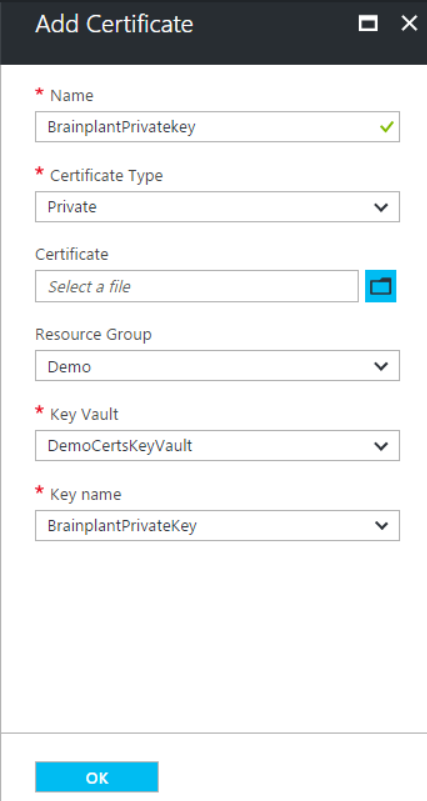 |
| Contoso’s Public key certificate |
Public keys need not be stored in the key vault. We can directly upload them.
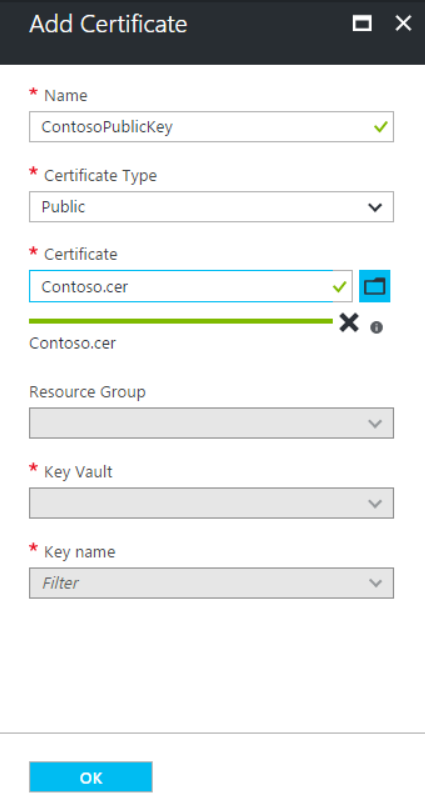 |
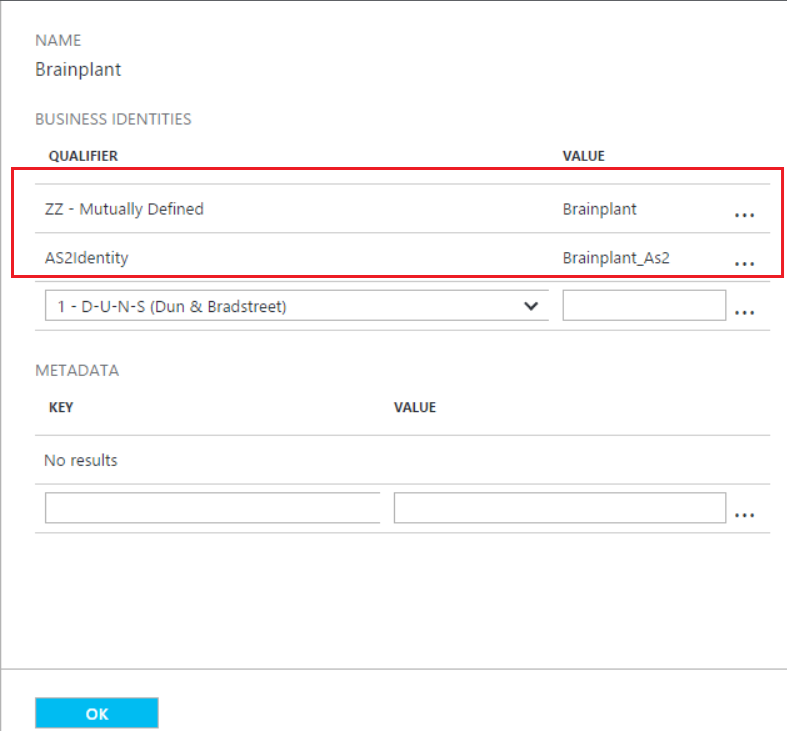
| Partner Brainplant |
Now we need to add a Trading Partner to the integration account.
· We need to add an AS2Identity under Business identifies. In our case, we use the AS2Identity Brainplant_AS2.
· Since we are planning to receive X12 message, we need to add EDI identity as well . In our case our EDI identity is Brainplant:ZZ
 |
| Partner Contoso |
Since we are receiving the messages from Contoso, we will also have to create a trading partner for it as well.
· We need to add an AS2Identity under Business identifies. In our case, we use the AS2 Identity Contoso_AS2.
· Since we are planning to receive X12 messages, we need to add an EDI identity as well. In our case our EDI identity is Contoso_X12:ZZ
 |
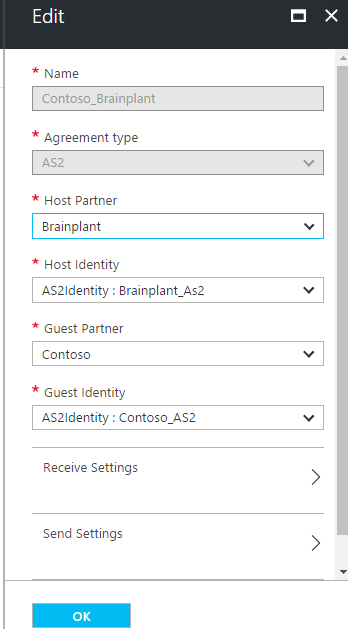
| AS2 Agreement
Contoso_Brainplant |
We must create an AS2 agreement between Contoso and Brainplant. Below are some important configurations.
· Configure AS2 identifiers. Here we need to remember to configure the host partner correctly. In our case Brainplant is the host partner and Contoso is the guest partner.
 · Following are the properties we need to configure under the receiver settings.
ð Ensure you check Override message properties
ð Select Message should be signed check box and select the public key certificate for Contoso which we added in the previous steps
ð Select Message should be encrypted check box and select the private key certificate which we added in previous steps.
=> Select the Send MDN check box.
· Following are the properties we need to configure under the receiver settings.
ð Ensure you check Override message properties
ð Select Message should be signed check box and select the public key certificate for Contoso which we added in the previous steps
ð Select Message should be encrypted check box and select the private key certificate which we added in previous steps.
=> Select the Send MDN check box.
 Note: Since we only receive the AS2 messages into logic apps, you don’t have to configure the Send Settings
 |
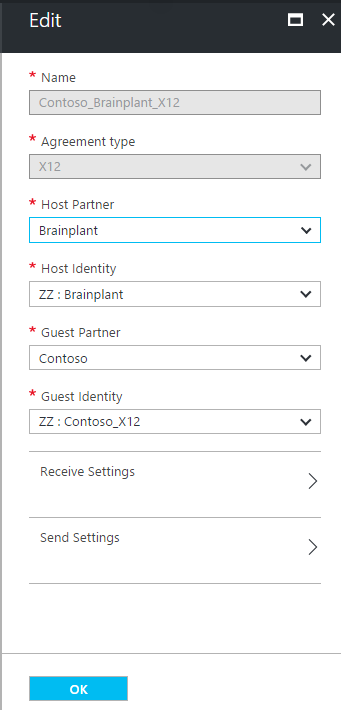
| X12 agreement
Contoso_Brainplant
_X12 |
Since we are receiving an X12 message, we will also need to have an X12 agreement. Below are important configurations that we need make.
· Configure the host and guest partners correctly
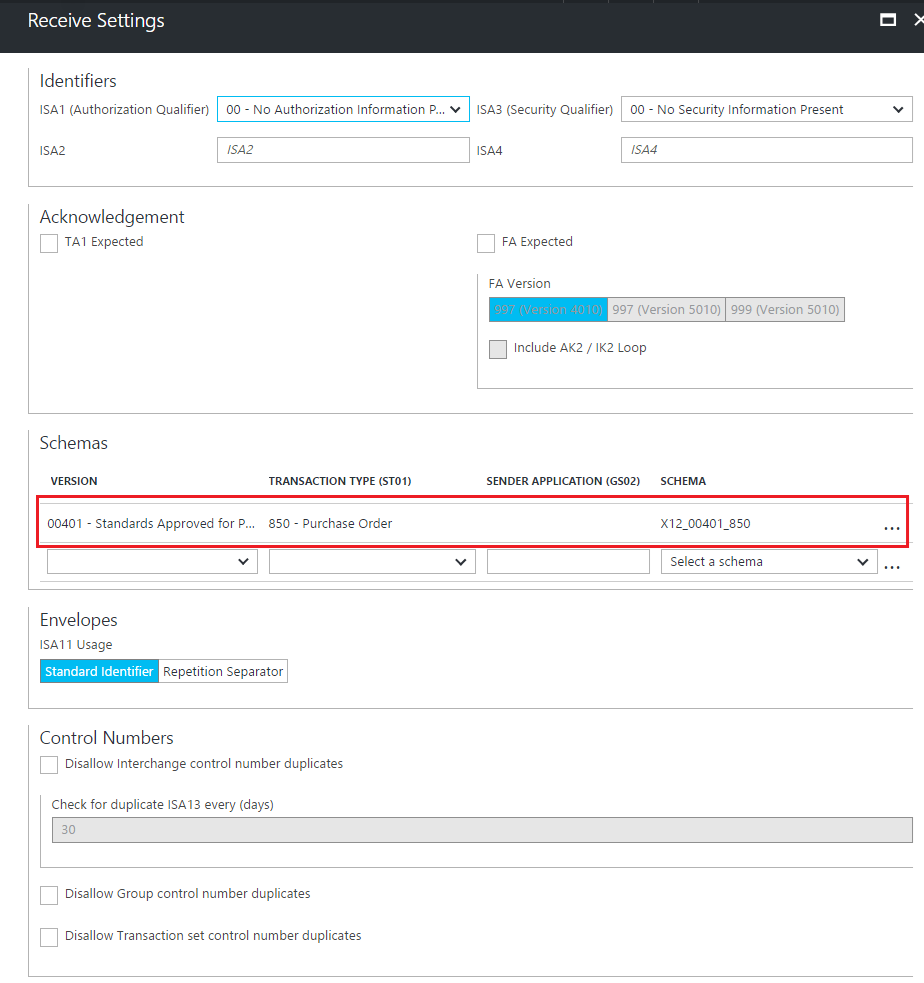
 · Under Receiver settings configure the X12 schema as highlighted below. Leave other options to default.
 |
You can download this article as a PDF document
Download now.
Creating Logic App
We will create a logic app named “
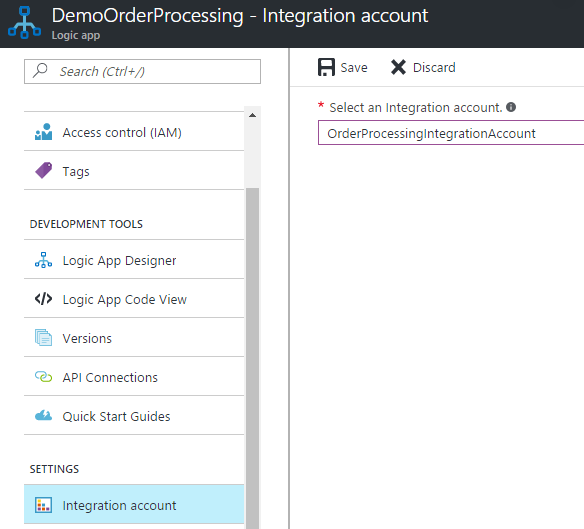
DemoOrderProcessing” using the
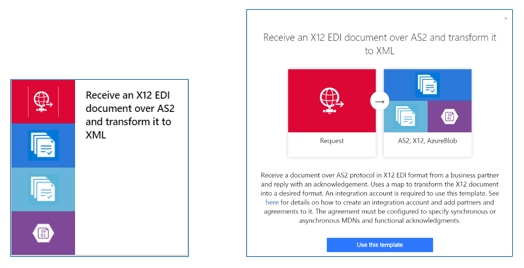
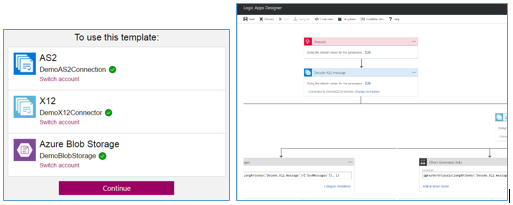
“Receive an X12 EDI document over AS2 and transform it to XML” template. Below, only the important configurations that we need to take care of while creating this logic app.
- Once you created a Logic App, you will have to associate it with an integration account as shown below. Save the settings.
- Click on Edit, you will be prompted to choose a template. Select the logic app template.
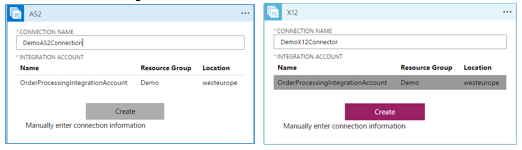
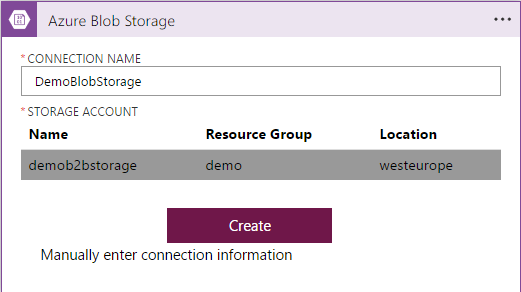
- We need to configure three different connections listed below.
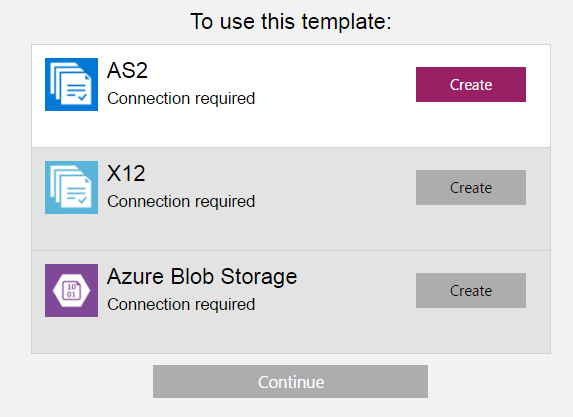
- When we configure the AS2 and X12 connectors, we need to select the integration account that we created before. Trading partners, agreements, schemas, maps and certificates will be used from this integration account.
- You also need to configure the storage account to send out the failed messages.
- When you press continue, it will open the logic app designer.
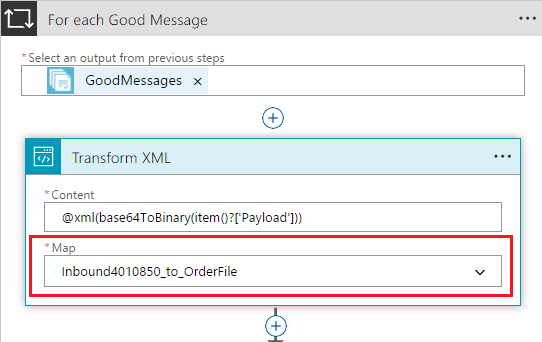
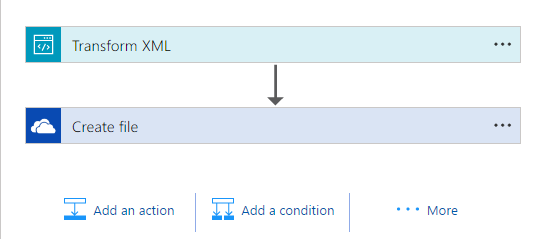
- Now we need to configure the TransformXML action with xslt file Inbound4010850_to_OrderFile.xsl.
- Since we want to send the transformed xml file to our OneDrive, we will configure the OneDrive connector.
- Now when you click save, the logic app should save successfully. However, you might face below error, which might be a UI bug.
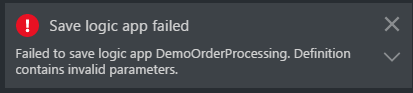
To avoid this, you need to open the logic app in Code mode and put an enter or space somewhere and try to save. That should give you a fully functional logic app.
- Copy the URL of the HTTP trigger, which you will require when you are configuring the BizTalk send port.
Creating BizTalk Interface
Following are the artefacts which need to be created in BizTalk. The files referenced below can be downloaded from GIT repository
https://github.com/brainplant/UsingCertificatesInLogicApps
| Artefact Name |
Type |
Description |
| Contoso.Orders |
BizTalk Application |
Create this application in BizTalk. All the following artefacts will be contained in this application. |
| X12_00401_850.xsd |
Schema |
Create a BizTalk project in Visual Studio, add this schema to the project and deploy the project into the Contoso.Orders Application. |
| Contoso.pfx |
Certificate |
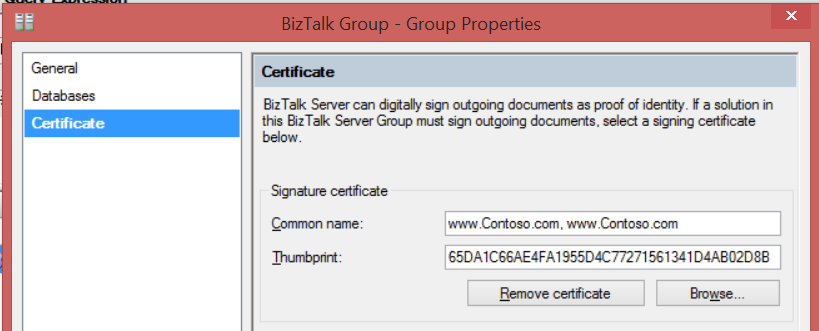
· Import the certificate Contoso.pfx into the BizTalk host instance service account’s Personal folder. You also need to import this file into Trusted Root Certification authorities.
· In the BizTalk Admin Console’s Group Hub page, configure this certificate.
 |
| Brainplant.cer |
Certificate |
· Import this certificate into BizTalk Host instance’s Other People store.
|
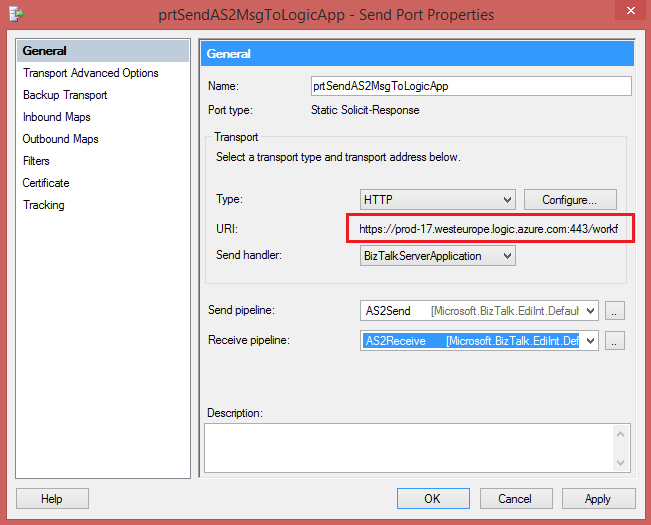
| prtSendOrder |
Send Port |
· Create a HTTP send port and configure the URL which we copied from the logic app.
 · Add a send port filter to receive messages from the receive port prtReceiveOrder
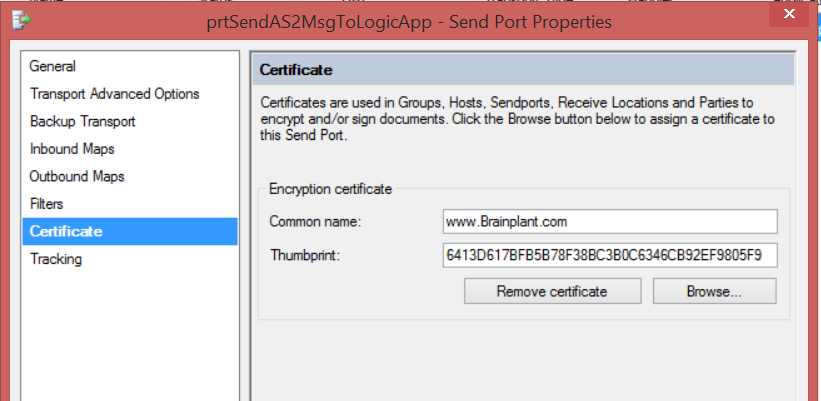
· In the Certificate section of the send port, configure the Brainplant’s public key certificate.
· Add a send port filter to receive messages from the receive port prtReceiveOrder
· In the Certificate section of the send port, configure the Brainplant’s public key certificate.
 |
| Brainplant Party |
Trading Partner |
Create a Party called Brainplant |
| Contoso Party |
Trading Partner |
Create a Party called Contoso |
| Contoso_Brainplant |
AS2 Agreement |
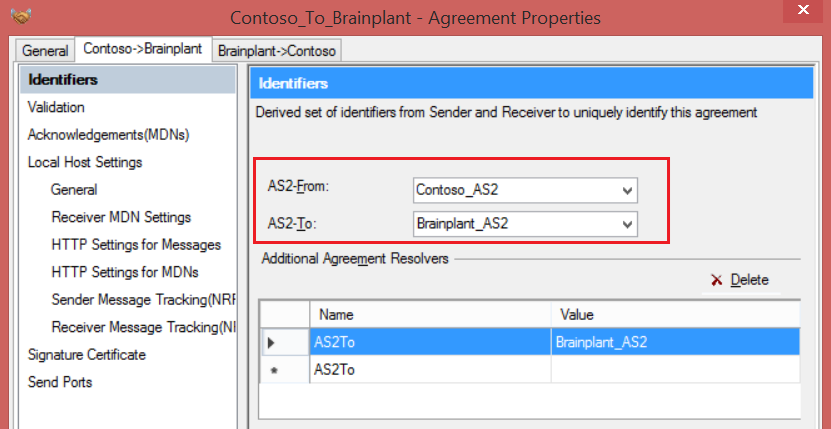
Create an AS2 agreement named Contoso_Brainplant.
· Configure the AS2 identifiers as shown in the picture below.
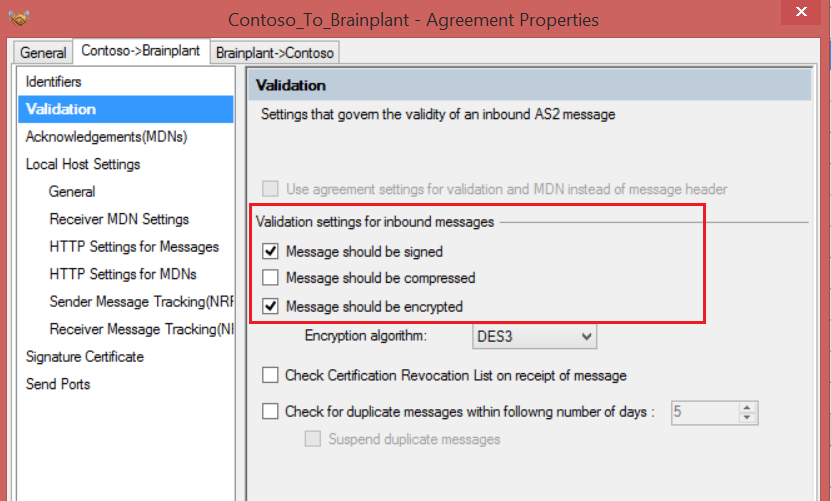
 · In the Validation section, select signing and encryption options as shown below.
 |
| Contoso_Brainplant
_X12 |
X12 Agreement |
Create an X12 agreement named Contoso_Brainplant_X12
· Configure the X12 identifiers as shown below.
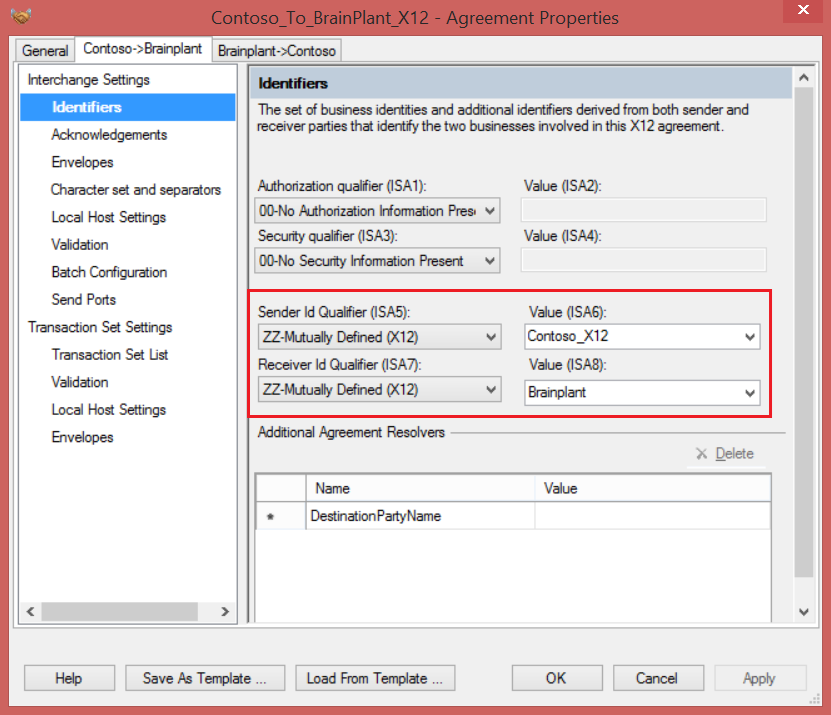 · You can leave the default options for the rest of the settings.
 |
Executing the solution
Now we have the BizTalk interface and the logic app ready to talk to each other. Use the sample file
850.xml which you can find in git hub location
https://github.com/brainplant/UsingCertificatesInLogicApps . Drop this file into receive location’s folder and you should have the message being sent to logic app, verified for signature and decrypted, transformed and pushed to OneDrive.
Note: I would recommend you to enable diagnostic logs on logic app and the integration account to troubleshoot any issues. If you want to know how to enable the diagnostic logs refer to a video link here
http://www.integrationusergroup.com/business-activity-tracking-monitoring-logic-apps/
Summary
Creating a B2B logic app to utilize an encryption and signing certificate is a very easy process. In our scenario, we have used self-signed certificates. However, when you are running them in production, you will be using certificates issued by certification authorities. Hope this end to end walkthrough gives you a jump start to creating B2B Logic apps.
You can download this article as a PDF document
Download now.
[adrotate banner=”8″]