Published on : Nov 20, 2018
Category : BizTalk360 Update
A few days ago, I helped a fellow “BizTalker” on a PowerShell script implementation that would monitor all your BizTalk Server BRE Policies, highest versions, that aren’t in the deployed state. You can know more about this on my blog: BizTalk DevOps: Monitor your BizTalk environment using PowerShell – Monitoring BRE Policies Pending to be Deployed.
However, my monitor script is, in fact, a combination of:
- A piece of PowerShell that invokes a SQL Query and notifies by email if any non-compliance occurs
- A SQL Server query that will have the ability to check what rules are in a non-compliance state; this is where the magic happens
I did that because out-of-the-box BizTalk360 doesn’t have the capability to monitor BRE Policies that aren’t in the deployed state. Despite that BizTalk360 allows you to create “Secure SQL Queries” that will enable us to:
- Write optimized SQL queries and store them with friendly names in BizTalk360
- Assign who will have permissions to run the queries
- Run the queries, of course
This will allow us to quickly check if any policy is in a non-compliance state.
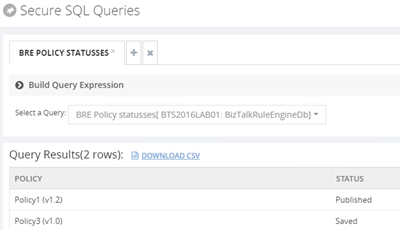
You can see and download the SQL script here: BizTalk360 Secure SQL Server Query to check BRE that are not in a Deployed state.
Nevertheless, you cannot implement monitoring capabilities on these Secure SQL Queries. This feature was made for allowing support persons to safely execute custom queries without impacting the environment.
So, I wanted to go a little further, and to do that I asked my great friend Lex Hegt (Technical Lead at BizTalk360) to help me to implement a monitoring mechanism for this strategy, using the existing features in BizTalk360 and… we did it!

How to monitor BRE using BizTalk360
The easy way for you is to download and import the BRE monitor alarm that I, along with Lex, developed here: BizTalk360 Monitor BRE Undeployed policies alarm.
To do that, after you download the zip file containing alarm information, you should:
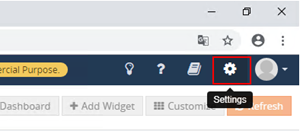
- Access to BizTalk360 and click ‘Settings‘ button on the upper right corner
- Select the ‘Import and Export‘ option from the left tree menu and select ‘Import‘
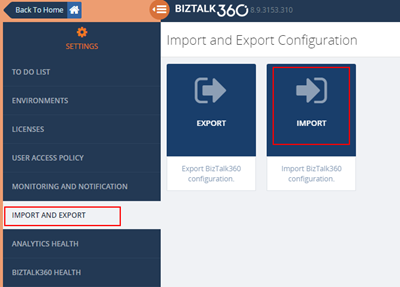
- Import operation is a 5-step process, as shown below:
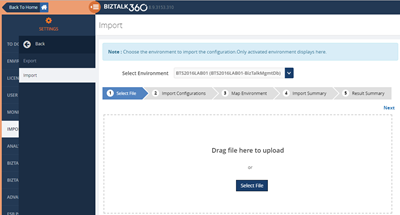
- Step 1 – Select configuration file (zip file containing alarm information): This is very straightforward, you just click on the ‘Select Files‘ button to choose the configuration file, or you can drag and drop the configuration file into the user interface as shown below.
-
- Step 2 – Choose the alarms you wanted to import: Once the configuration file is selected, the wizard will automatically move forward into step 2 and display all the alarms that are present in the configuration file. You can then either choose to import all of them or select only the specific alarms you wanted to import as shown below.
- As you will see in the picture below, we also include the Secure SQL Queries, you should also select them;
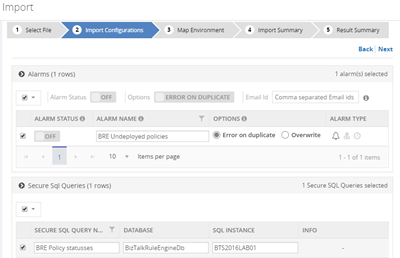
-
-
- Note that by default all the alarms are kept in disabled status to avoid sending unnecessary notification after import, you may want to review all the configuration before enabling it
- Step 3 – Map environment discrepancies: Once you have chosen the relevant alarms to import, the system will detect if there is any mapping required between the source system and destination system. The three common things that will require mapping are BizTalk Server, SQL Server, and SQL Server Instance names since they will, for sure, differ between environments. The third screen ‘Map Environment‘ will give the user the option to do this mapping as shown below.
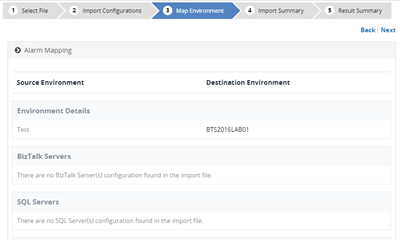
-
- Step 4 – Review the summary: On the fourth screen, based on the selection and mapping so far, will give a final summary report. It will also give bit more detail on each alarm, for example which artifacts are configured in each one of them (you need to expand the down arrow to view it). Once you are happy, you can just click on the ‘Import‘ button
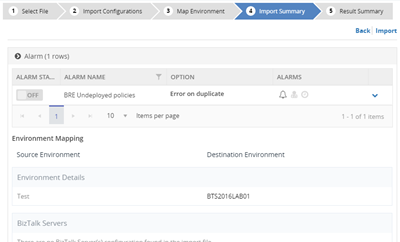
-
- Step 5 – Result summary and exception handling: Once the import button is clicked, all necessary backend calls will be made, and the result of the import process will be shown. You can view all the details like which artifacts are imported, what mapping applied etc. If there are any errors during the import process in specific alarms, those will be displayed as well
- Once you close the import wizard, you can navigate to the ‘Manage Alarms‘ screen in the Monitoring section, and you can view all the imported alarms.
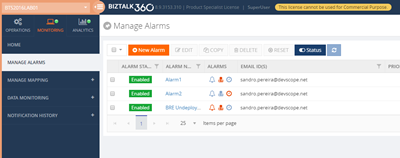
Of course, you can always create your alarm manually by:
- Click ‘Monitoring‘ in the Navigation panel
- Click ‘Manage Alarms‘ tab
- Click ‘New Alarm‘
- Enter a descriptive name for the Alarm, Email id (you can enter multiple email ids as comma separated values), and Alarm Description
- Click ‘Next‘ to enter the Threshold Alarm page
- Select the ‘Alert on threshold violation’ check box if you want to be alerted upon a threshold violation.
- Click ‘Next‘ to enter the Health Monitoring Alert page
- This step is optional, if you want to use the alarm for regular health/status check, you can select day(s)/time when you want to receive the status alert
- Click ‘Next‘ to move to the screen to set up data monitoring alert.
- Select the checkbox ‘Use this alarm for data Monitor Alerts’ if you wish to associate the current alarm with the data monitors.
- Select the checkbox ‘Notify on Success as well’ to receive success email alerts for the configured data monitors. If you do not choose the second checkbox, you will not receive the success email alerts.
- Click ‘Next‘ to move to the last section of adding the Advanced Settings information
- All the settings in the Advanced settings page are optional. Set the phone number to receive the Notification SMS when the alert is triggered. As with the email ids, you can enter multiple phone numbers as comma separated values.
- Click ‘OK‘ to create the alarm
- The alarm will be created, and you will be redirected to the Manage Alarms page
But if you choose this approach you will them need to:
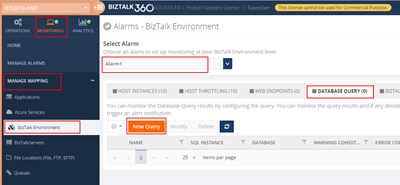
- Select the ‘Manage Mapping‘ in the Navigation pane under ‘Monitoring‘ and then:
- Select the alarm you just created above or that you already have in your environment
- Select the tab option ‘Database Query‘
- Finally, create two new queries, by selecting the button ‘New Query‘
- One for monitoring BRE on Published state
- Another for monitoring BRE on Saved state
-
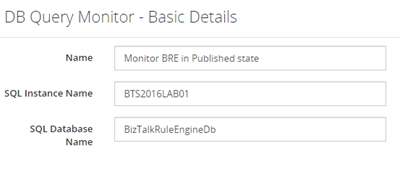
- After you press the ‘New Query‘ button you need:
- Enter the Name for the Database Query
- Add the SQL Instance name
- And the SQL Database name
- This need to be “BizTalkRuleEngineDb“
-
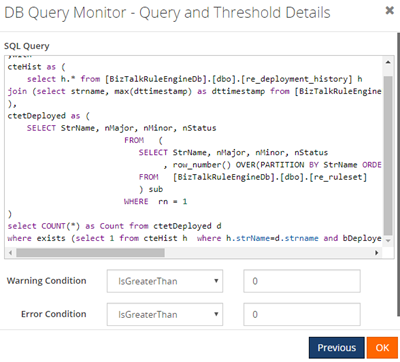
- Click ‘Next‘ to add the Query and Threshold details
- This will define when BizTalk360 must return an alert and notify us if any non-compliance occurs
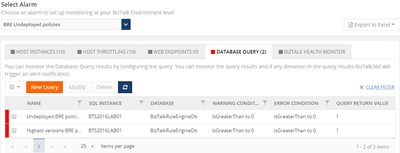
If you noticed, my queries have a red flag which means that I have non-compliance BRE and I will get an alert.
Now you have your favorite monitoring tool be able to monitor the state of your BRE!


