
Welcome again to another BizTalk Server Best practices, Tips, and Tricks blog post! In my previous blog posts, I discussed some essential tips and tricks for BizTalk Server administrators:
And for BizTalk Server Developers:
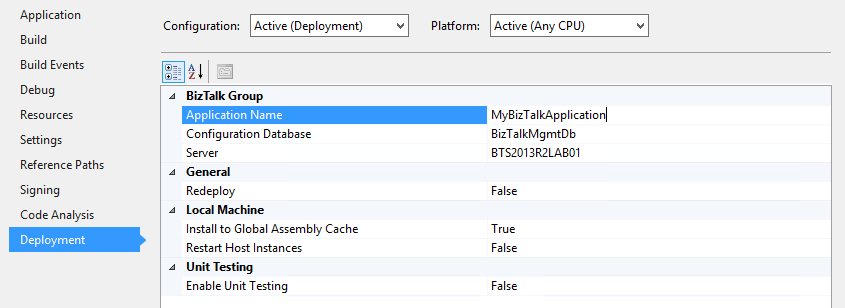
Today I’m going to speak about another critical Best practice, Tips and Tricks for BizTalk Server developers: How to easily configure Visual Studio BizTalk Server Deployment properties.

It’s nothing new – especially for BizTalk developers with experience – that before you can deploy a solution from Visual Studio into a BizTalk application, you must first set project properties. Otherwise, two things may happen:
So, if that is so basic, why I’m addressing this?
Indeed it is one of the BizTalk developer’s most basic tasks if you want to deploy the solution from Visual Studio – and this happens almost every time we are doing a solution or changing a solution in the development environment. But you need to be aware, and this is important: If a solution in Visual Studio contains multiple projects, you must separately configure the properties for each project.
To configure project properties, you normally need to:
But you may encounter two main issues or problems with this:
So, is there a better and fast way?
Yes, there is, and that is why I like PowerShell! We can easily script these tasks with a simple PowerShell script and reuse it for all projects.
For example, with this PowerShell: Fixing BizTalk Project Deployment Properties with PowerShell, you can parameterize all projects inside a Visual Studio Solution running a single line of code and avoid spending numerous hours doing this task manually.
$allPropertyGroup = $xml.Project.PropertyGroupforeach($node in $allPropertyGroup){ if($node.Server -ne $null) { #If the Deployment Setting already exists, then we just need to update them $addNewNodeFlag = $false $node.Server= $ServerName; $node.ConfigurationDatabase= $DatabaseName; $node.ApplicationName= $ApplicationName; $node.Redeploy= $RedeployFlag; $node.Register= $RegisterFlag; $node.RestartHostInstances= $RestartHostInstancesFlag; }}if($addNewNodeFlag -eq $true){ #Add a PropertyGroup node if the Deployment Setting doesn't exist $newXmlPropertyGroup = $xml.CreateElement("PropertyGroup", "http://schemas.microsoft.com/developer/msbuild/2003") $newXmlPropertyGroup.SetAttribute(“Condition”,”'`$(Configuration)|`$(Platform)' == 'Debug|AnyCPU'”); $newXmlElement = $newXmlPropertyGroup.AppendChild($xml.CreateElement("Server", "http://schemas.microsoft.com/developer/msbuild/2003")); $newXmlTextNode = $newXmlElement.AppendChild($xml.CreateTextNode($ServerName)); $newXmlElement = $newXmlPropertyGroup.AppendChild($xml.CreateElement("ConfigurationDatabase", "http://schemas.microsoft.com/developer/msbuild/2003")); $newXmlTextNode = $newXmlElement.AppendChild($xml.CreateTextNode($DatabaseName)); $newXmlElement = $newXmlPropertyGroup.AppendChild($xml.CreateElement("ApplicationName", "http://schemas.microsoft.com/developer/msbuild/2003")); $newXmlTextNode = $newXmlElement.AppendChild($xml.CreateTextNode($ApplicationName)); $newXmlElement = $newXmlPropertyGroup.AppendChild($xml.CreateElement("Redeploy", "http://schemas.microsoft.com/developer/msbuild/2003")); $newXmlTextNode = $newXmlElement.AppendChild($xml.CreateTextNode($RedeployFlag)); $newXmlElement = $newXmlPropertyGroup.AppendChild($xml.CreateElement("Register", "http://schemas.microsoft.com/developer/msbuild/2003")); $newXmlTextNode = $newXmlElement.AppendChild($xml.CreateTextNode($RegisterFlag)); $newXmlElement = $newXmlPropertyGroup.AppendChild($xml.CreateElement("RestartHostInstances", "http://schemas.microsoft.com/developer/msbuild/2003")); $newXmlTextNode = $newXmlElement.AppendChild($xml.CreateTextNode($RestartHostInstancesFlag)); $xml.Project.InsertAfter($newXmlPropertyGroup, $xml.Project.PropertyGroup[1])} |
THIS POWERSHELL IS PROVIDED “AS IS” WITHOUT WARRANTY OF ANY KIND.
You can download Visual Studio: Fixing BizTalk Project Deployment Properties with PowerShell from GitHub here: https://github.com/sandroasp/BizTalk-Server-Resources/tree/master/PowerShell-scripts/vs-Fixing-BizTalk-Project-Deployment-Properties
Stay tuned for the following BizTalk Server Best practices, Tips, and Tricks.