Published on : Aug 11, 2017
Category : BizTalk Server
Business Activity Monitoring (BAM) is used to monitor a business process through Data and Milestones. The collection of Data and Milestone is Activity and The collection of Each Activity is View. The BAM contains the concept of Continuation and Relationships which used to enhance the relational activity.
Relationships are used when the activity definition file contains more than one activity. Imagine an organization takes an order from the customer. For one order request, there may be multiple responses arrive from an organization. The relationship between one order and multiple responses are established using a one CommonID which should be common between two activities.
Create a Visual Studio Project:
1.Create a Simple BizTalk Application in Visual Studio name as “BAMTraningRelation”.
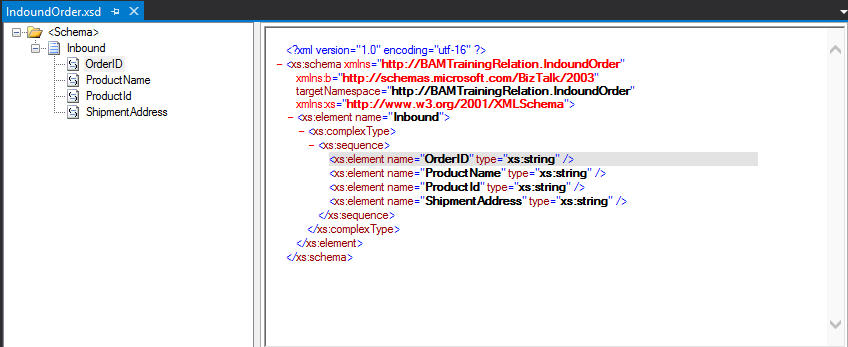
2.Create an “InboundOrder” Schema with below Child field elements to get an order from the customer
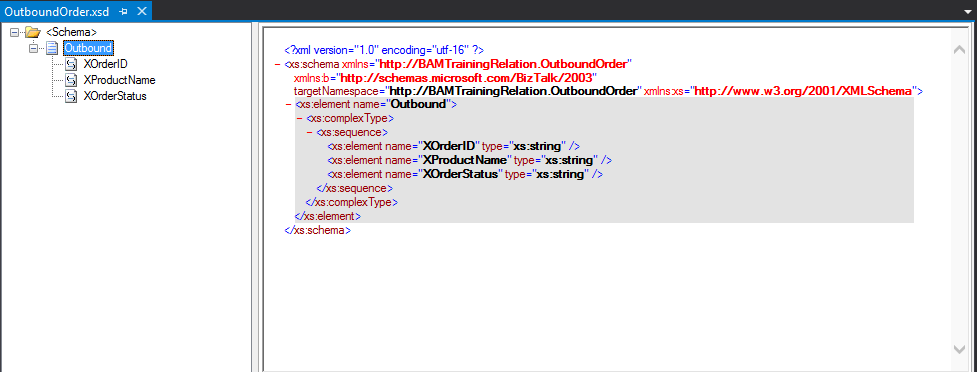
3.Create an “OutboundOrder” Schema with below Child Field Element which is used to send an acknowledgment from the organization.
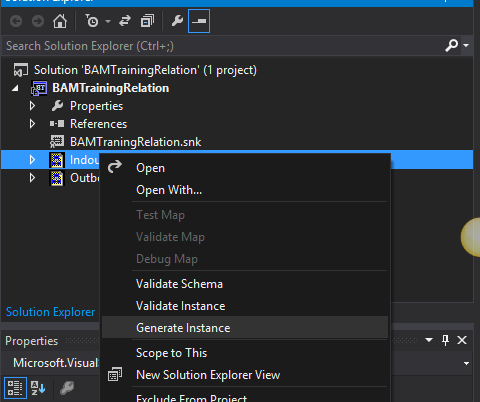
4.Generate an Instance by Right clicking the schema for both “InboundOrder” and “OutboundOrder”.
5.Open the properties window and create a key in Signing and in Deployment provide the Application Name as “BAMTrainingRelation” then save and deploy the project.
Create an Send Port and Receive Port In BizTalk Application:
Open the deployed application“BAMTraningRelation” in BizTalk Server and then follow the below steps to configure the send and receive port.
1.Create a One Way Receive Port and Receive Location.


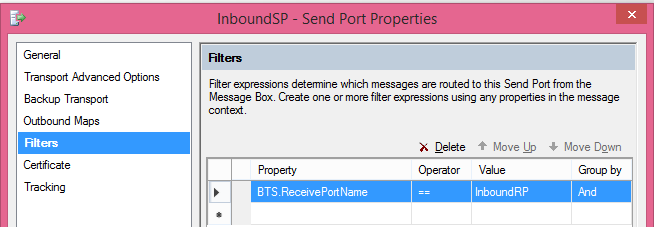
2.Create a One Way Send Port for the created Receive Port and Receive Location by setting the filter for both “InboundSP” and “OutboundSP”.

Create a BAM Views:
The creation of activities and Views in Excel sheet is equivalent to designing the container that represents data to the end users. Follow the below steps to create the BAM Views and Activities.
1.Open the Excel and go to File->Option and click the Addins and Select the Business Activity Monitoring.
2.Select the BAM->BAM Activity.

3.Create a below-mentioned Item in an “InboundOrderActivity”.
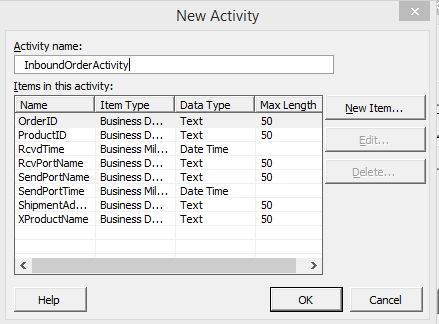
4.Crete another activity as “OutboutOrderActivity” with below-mentioned Item.
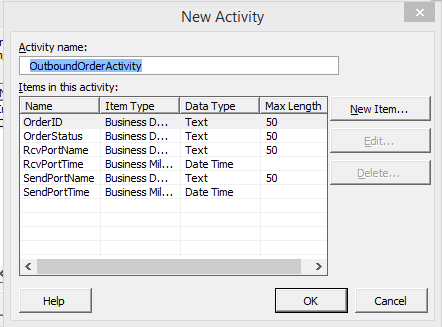
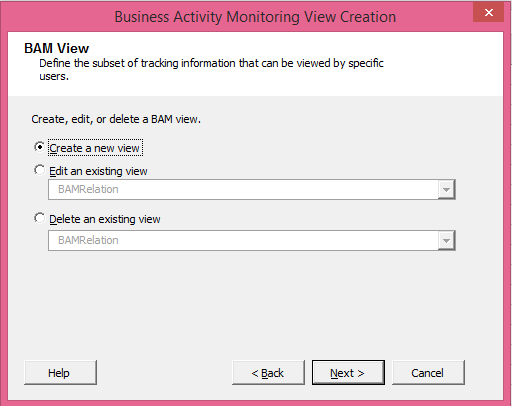
5.Click Ok when the BAM View Creation window opens and select next it will navigate the initial view page as mentioned below.
6.Select Next and enter the view name and Select the activity as shown below.
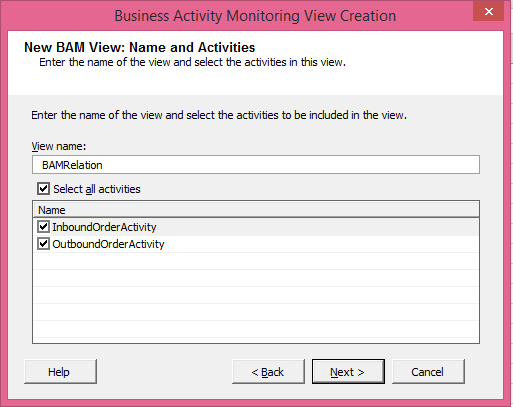
In the next window, select the item as shown below.
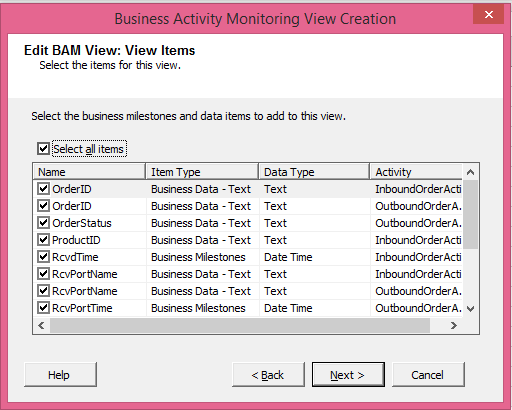
And click a couple of next and then click ok. Then the BAM Views is created and the user can export the BAM View in XML format by Clicking BAM-> BAM Activity->Export XML.
To Deploy the BAM View:
- Open the Command prompt as administrator
- Navigate to the %BTSInstallPath%/Tracking folder.
- Use the below command
bm.exe deploy-all -DefinitionFile:”<<FileLocation>>\BAMTraining.xml”

Configuring tracking Profile Editor for Inbound Order Activity:
Tracking Profile Editor tool is used to bind the data to the port.
1.Go to Start -> Tracking Profile Editor.
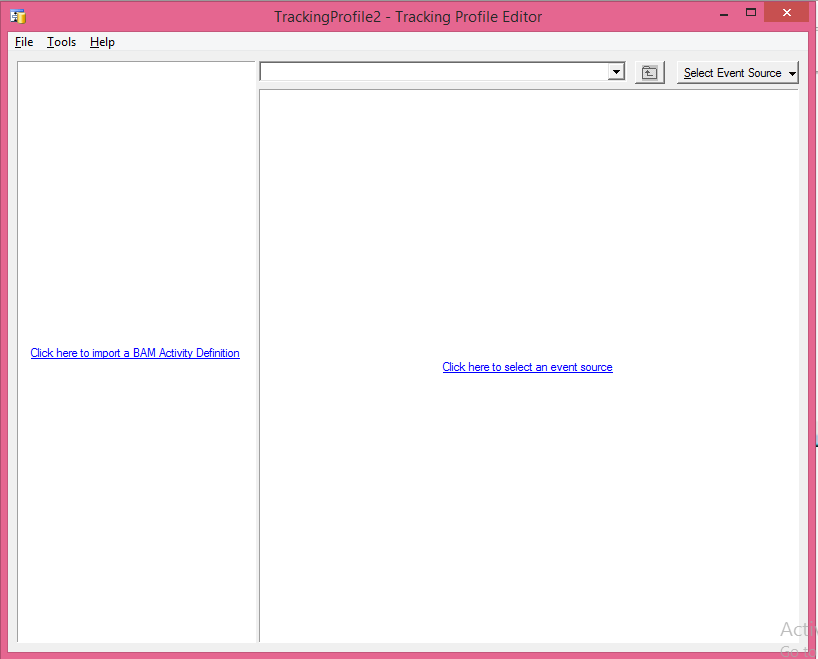
2.Click the “Click here to import a BAM Activity Definition” and then Select the “InboundOderActivity”.
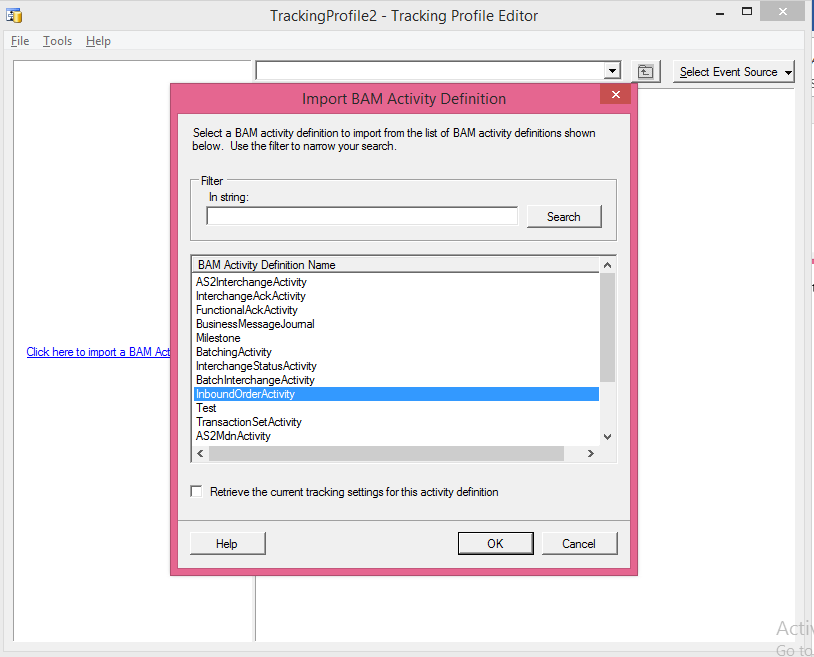
3.The Activity status window is populated and select the Event Source
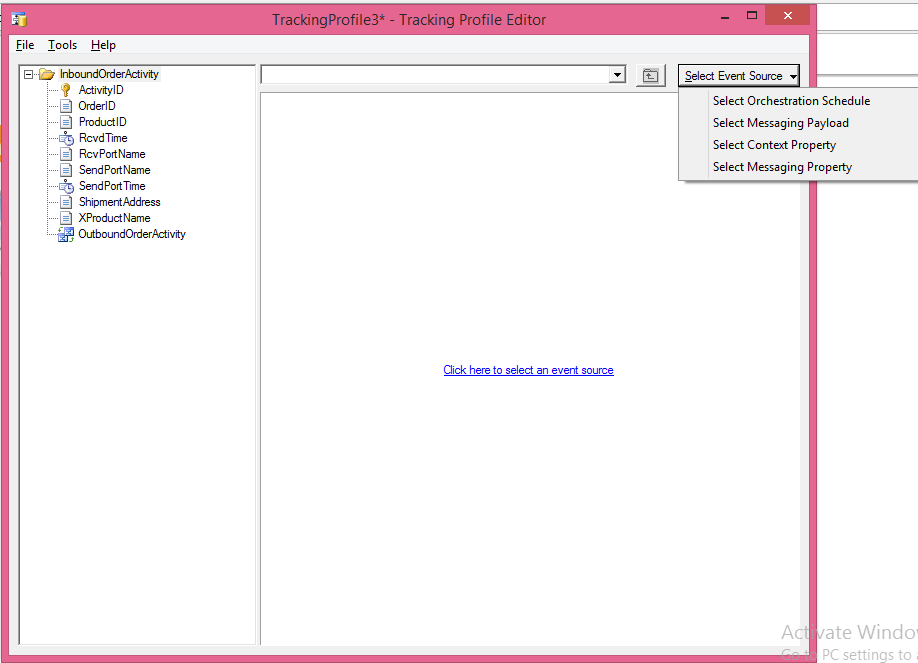
| Event source |
Description |
| Orchestration Schedule |
Orchestration Properties |
| Messaging Payload |
Deployed Schema Elements |
| Context Property |
BizTalk Context Properties |
| Messaging Property |
Message/Port Properties |
4.Follow the below step to drag and drop the properties from right pane (Event Source) to the left pane (Activity window).
| Activity Column Name |
Event Source |
Property/element Name |
Port Name |
| ActivityID |
MessagingPayload-> BAMTrainingRelation
InboundOrderActivity->OrderID |
OrderID |
InboundRP |
| OrderID |
MessagingPayload-> BAMTrainingRelation
InboundOrderActivity->OrderID |
OrderID |
InboundRP |
| ProductID |
MessagingPayload-> BAMTrainingRelation
InboundOrderActivity->ProductID |
ProductID |
InboundRP |
| XProductName |
MessagingPayload-> BAMTrainingRelation
InboundOrderActivity->ProductName |
ProductName |
InboundRP |
| ShipmentAddress |
MessagingPayload-> BAMTrainingRelation
InboundOrderActivity ->ShipmentAddress |
ShipmentAddress |
InboundRP |
| RcvPortName |
ContextProperty-> BTS.ReceivePortName |
BTS.ReceivePortName |
InboundRP |
| RcvdTime |
Messaging Property-> PortStartTime |
PortStartTime |
InboundRP |
| SendPortName |
ContextProperty-> BTS.SPName |
BTS.SPName |
InboundSP |
| SendPortTime |
Messaging Property-> PortEndTime |
PortEndTime |
InboundSP |
To Insert the Continuation and Document Reference URL For InboundOrderActivity:
1.To Insert Continuation->Right Click the InboundOrderActivity->Select New Continuation and assign InterchangeID form Messaging Property and Right click InterchageID and Select the Send Port Mapping to the InboundRP
2.To Insert ContinuationID->Right Click the InboundOrderActivity-> Select New ContinuationID (Rename as Continuation) and assign InterchangeID form Messaging Property and Right click InterchageID and Select the Send Port Mapping to the InboundSP.
3.To Insert Document Reference URL->Right Click the InboundOrderActivity->Select New Document Reference URL and assign Transmitted file Location form Context Property (select the Messaging tracking. Transmitted File Location) and Right click TransmittedFileLocation and Select the Send Port Mapping to the InboundSP.
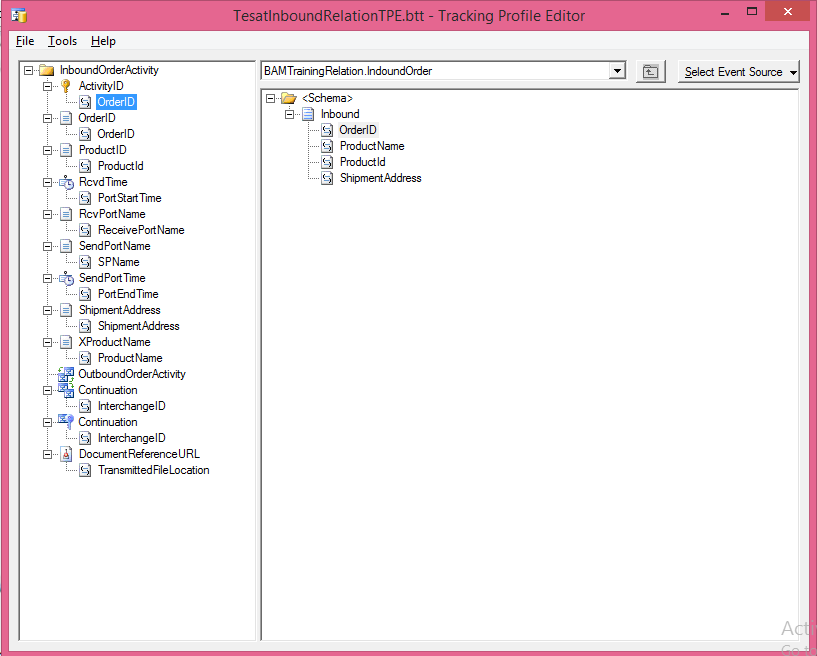
After mapping, go to Tools->Click Apply Tracking Profile Editor. Then save the Tracking Profile Editor as “TestInboundRelationTPE.btt”.
Configuring tracking Profile Editor for Outbound Order Activity:
Open a New Tracking Profile Editor and open the OutboundOrderActivity on Left Pane and assign the Values as shown below.
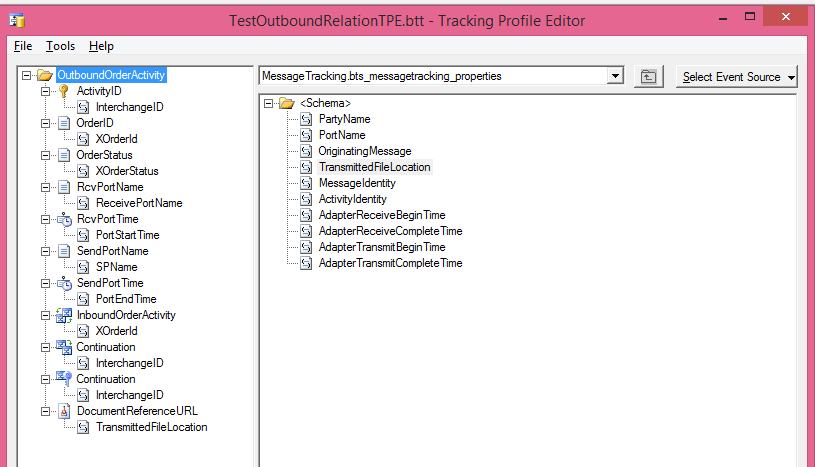
| Activity Column Name |
Event Source |
Property/element Name |
Port Name |
| ActivityID |
Messaging Property-> InchangeID |
InterchangeID |
OutboundRP |
| OrderID |
MessagingPayload-> BAMTrainingRelation
OutboundOrderActivity ->XOrderID |
XOrderID |
OutboundRP |
| OrderStatus |
MessagingPayload-> BAMTrainingRelation
OutboundOrderActivity ->OrderID |
XOrderStatus |
OutboundRP |
| RcvPortName |
ContextProperty -> BTS.ReceivePortName |
BTS.ReceivePortName |
OutboundRP |
| RcvdTime |
Messaging Property-> PortStartTime |
PortStartTime |
OutboundRP |
| SendPortName |
ContextProperty-> BTS.SPName |
BTS.SPName |
OutboundSP |
| SendPortTime |
Messaging Property-> PortEndTime |
PortEndTime |
OutboundSP |
| InboundOrder Activty |
MessagingPayload-> BAMTrainingRelation
OutboundOrderActivity ->XOrderID |
XOrderID |
OutboundRP |
To Insert the Continuation and Document Reference URL For InboundOrderActivity:
1.To Insert Continuation->Right Click the OutboundOrderActivity->Select New Continuation and assign InterchangeID form Messaging Property and Right click InterchageID and Select the Send Port Mapping to the OutboundRP
2.To Insert ContinuationID->Right Click the OutboundOrderActivity-> Select New ContinuationID (Rename as Continuation) and assign InterchangeID form Messaging Property and Right click InterchageID and Select the Send Port Mapping to the OutboundSP.
3.To Insert Document Reference URL->Right Click the OutboundOrderActivity->Select New Document Reference URL and assign Transmitted File Location Form Context Property (select the Messaging tracking. Transmitted File Location) and Right click TransmittedFileLocation and Select the Send Port Mapping to the OutboundSP.
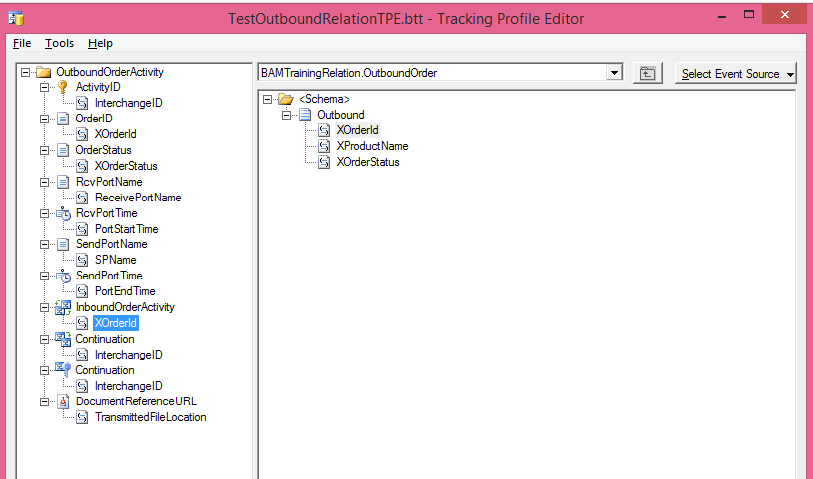
After mapping, go to Tools->Click Apply Tracking Profile Editor. Then save the Tracking Profile Editor as “TestOutboundRelationTPE.btt”.
To populate Data In BAM For InboundOrderActivity:
1.Edit The Generated instance file “InboundOrder” as shown below.
<ns0:Inbound xmlns:ns0="http://BAMTrainingRelation.IndoundOrder">
  <OrderID>OID5</OrderID>
  <ProductName>Departmental Store</ProductName>
  <ProductId>PId5</ProductId>
  <ShipmentAddress>India</ShipmentAddress>
</ns0:Inbound>
2.Transfer the generated instance file “InboundOrder” to InboundRP file location and “OutboundOder” to OutboundRP wheatear the output is transferred to the “InboundSP” and “OutboundSP” file Location.
3.Goto BAM Portal and Select the “InboundOrderActivity” and Execute the Query and the result will be shown below
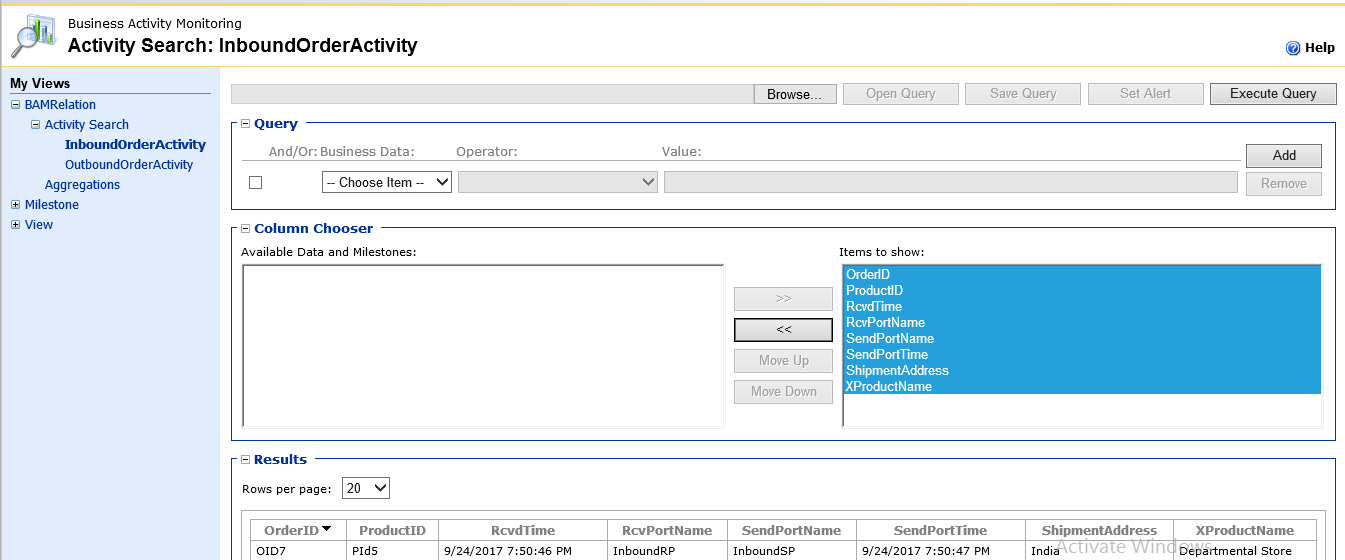
4.Click the Result which navigates to Activity status window will contain the Related Documents and Related Activities.The related documents will show the document URL at the bottom of the page.
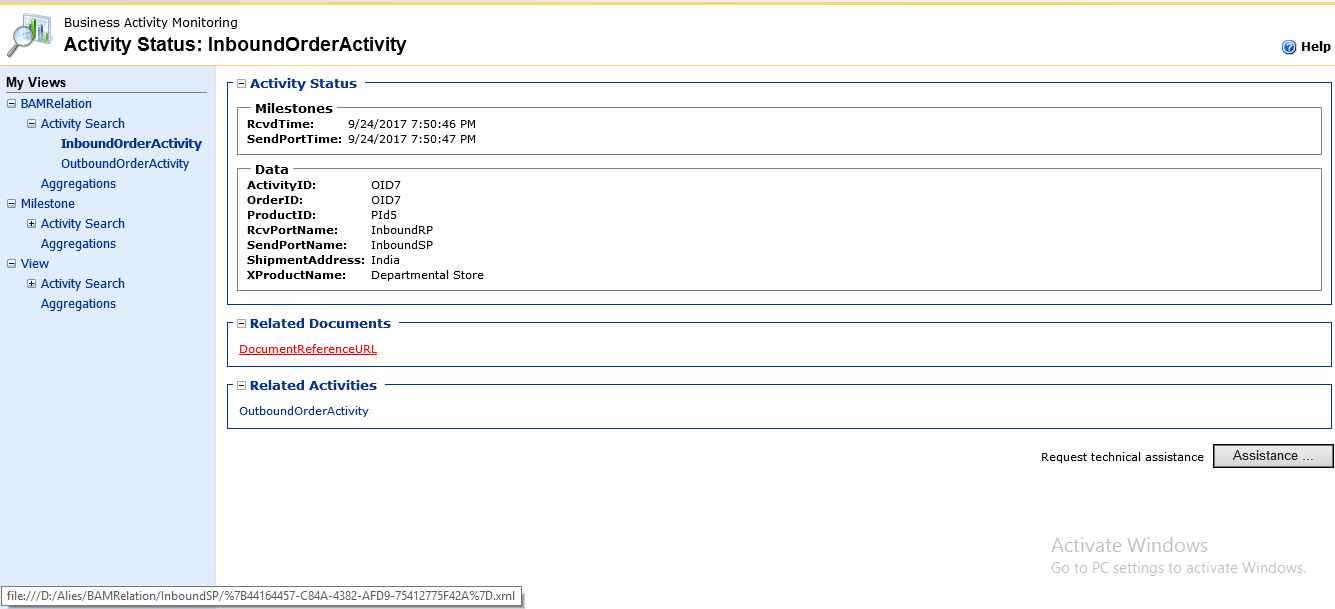
5.Click the Outbound Activity will navigate to the OutboundOrderActivity status window received for the OrderId “ODID7” as shown below.
 Note:
Note: The more status can be received for the same orderID and the user can create one or more Related Documents for the Activity.

 3.Create an “OutboundOrder” Schema with below Child Field Element which is used to send an acknowledgment from the organization.
 4.Generate an Instance by Right clicking the schema for both “InboundOrder” and “OutboundOrder”.
 5.Open the properties window and create a key in Signing and in Deployment provide the Application Name as “BAMTrainingRelation” then save and deploy the project.

 2.Create a One Way Send Port for the created Receive Port and Receive Location by setting the filter for both “InboundSP” and “OutboundSP”.


 3.Create a below-mentioned Item in an “InboundOrderActivity”.
 4.Crete another activity as “OutboutOrderActivity” with below-mentioned Item.
 5.Click Ok when the BAM View Creation window opens and select next it will navigate the initial view page as mentioned below.
 6.Select Next and enter the view name and Select the activity as shown below.
 In the next window, select the item as shown below.
 And click a couple of next and then click ok. Then the BAM Views is created and the user can export the BAM View in XML format by Clicking BAM-> BAM Activity->Export XML.
To Deploy the BAM View:


 After mapping, go to Tools->Click Apply Tracking Profile Editor. Then save the Tracking Profile Editor as “TestInboundRelationTPE.btt”.

 4.Click the Result which navigates to Activity status window will contain the Related Documents and Related Activities.The related documents will show the document URL at the bottom of the page.
 5.Click the Outbound Activity will navigate to the OutboundOrderActivity status window received for the OrderId “ODID7” as shown below.
 Note: The more status can be received for the same orderID and the user can create one or more Related Documents for the Activity.